
AS4 Adapter for Microsoft BizTalk
Requirements: /n software Adapters for Microsoft BizTalk
Introduction
The /n software Adapters for Microsoft BizTalk include fully-managed .NET Adapters that seamlessly integrate with the BizTalk Messaging Pipeline. The /n software Adapters extend the features of BizTalk with advanced Internet communications and secure messaging capabilities.
This guide will focus specifically on the AS4 adapter, which is used to both send and receive EDI documents. Before continuing it is recommended to download the product and follow along with the tutorial.
Contents
AS4 Receive Adapter
The AS4 Receiver adapter works by connecting to a server and requesting files to download (pull) from a specified Message Partition Channel (MPC). All files present in the MPC will be downloaded in the polling interval. Receipts will automatically be sent if Send Receipt is True.
To begin, create a new receive location named "testAS4.Receiver" with a transport type of nsoftware.AS4 2016.
Most of the default values
are valid and will not need to be changed, but some additional information must be specified.
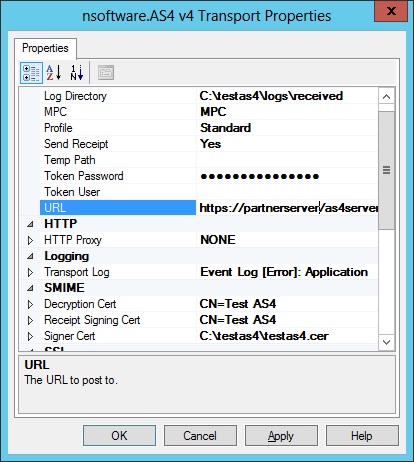
Below is a list of common properties used when receiving AS4.
A test certificate may be downloaded if desired. There is no password.
URL
This will be the URL to which the request is made. Both plaintext (http://) and SSL (https://) URLs are supported.
MPC
This is the Message Partition Channel (MPC) from which to receive files.
Log Directory
The directory in which log files are created. The adapter will create log files that detail each transmission. To enable more verbose logging set the Transport Log Log Mode to Verbose.
SendReceipt
This property indicates whether a receipt should be sent after downloading files. The default is True.
Decryption Cert
This is the certificate with private key which will be used to decrypt incoming messages. Click the ellipses to open the Certificate Selector Dialog.
Select the PFX Store tab and browse to the certificate with private key. For instance the "testas4.pfx" file mentioned above. Specify the passphrase and click the Open button (the test certificate does not have a password). The subject of the certificate (CN=Test AS4) will be visible. Highlight the subject by clicking on it and then click the OK button. The Certificate Selector Dialog should look like this:

Once closed the value of the Encryption Cert property should be CN=Test AS4. Your trading partner must configure the corresponding public certificate so that they will be able to encrypt messages to send to you. This also applies to the Signing Cert property so they can verify signatures created by the adapter.
Signer Cert
This is the public certificate obtained from your trading partner. This is used to verify the signature of incoming messages. In this tutorial
both the sender and receiver will be using the same digital id and corresponding certificate.
Click the ellipses button to open the certificate selector dialog. Notice that the PFX Store option is not available. This is because
Signer Cert requires only a public certificate (not a certificate with private key).
Select the Public Key / Certificate tab and browse to the testas4.cer file. Click the Open button to load the certificate. The Certificate Selector should look like this:
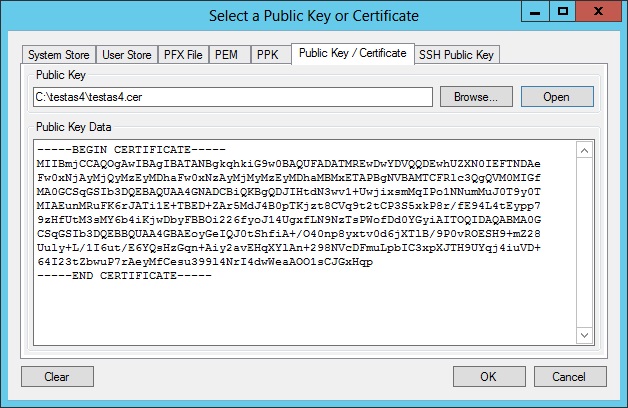
Once closed you should see the value of Signer Cert as C:\testAS4\testas4.cer.
Signing Cert
The Signing Cert specifies the certificate with private key used to sign the request made to the server, and
also to sign outgoing receipts. In many cases this is the same as Decryption Cert.
Finish
The AS4 Receive Adapter is now configured. Click OK to close the adapter properties window.
AS4 Send Adapter
The AS4 Send Adapter will send a file to the specified server (push). If RequireReceipt is True (default)
the adapter will expect a receipt in response and will verify it as applicable. Typical properties used by the AS4 Send Adapter
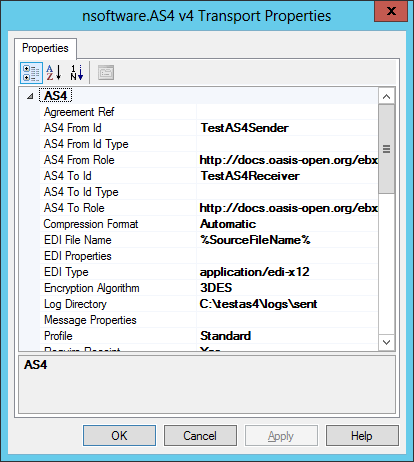
are listed below.
URL
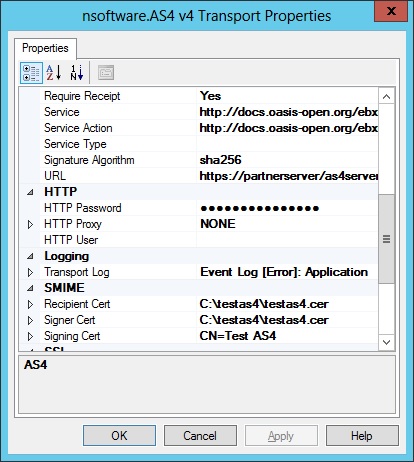
This property is the same as it is in the receive adapter. It specifies the URL to which the request is made. Both plaintext (http://) and SSL (https://) URLs are supported.
AS4 From Id
This is your Identifier for sending files.
AS4 To Id
This is your trading partner's identifier.
Log Directory
This indicates the location where all of the sent logs will be generated.
Recipient Cert
This is your trading partner's public certificate. This is used to encrypt data sent to your partner.
Signer Cert
This is your trading partner's public certificate (for signing). This is used to verify signatures on received messages. In most cases this is the same as Recipient Cert.
Signing Cert
This is your certificate with private key. It is used to sign outgoing messages. The public certificate must be
configured on your partner's system so they can verify the signature on messages sent by the adapter.
Finish
The AS4 Send Adapter is now configured. Click OK to close the adapter properties window.
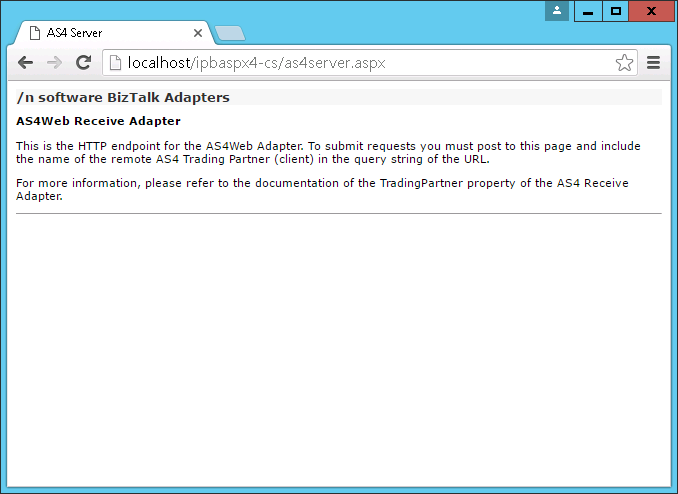
AS4Web Receive Adapter
The AS4Web Receive Adapter can be used to accept files from a partner. In this case your partner sends a file to AS4Web (push).
The AS4Web Receive Adapter is an isolated adapter and must be hosted in a HTTP endpoint within IIS to accept requests from the sending entity.
Hosting the HTTP Endpoint in IIS
Since the AS4Web Receive Adapter receives requests over HTTP, an endpoint must be configured under IIS to forward the AS4 request to BizTalk. The setup includes a HTTP endpoint project. In most cases no changes are needed, but you may optionally inspect or modify the files within the HTTP endpoint as needed.
The HTTP endpoint project can be opened from the start menu by selecting the "AS4 Receiver HTTP EndPoint (C# Project)" link from the start menu. Alternatively, the project is located in the aspx directory of the installation. For instance:
C:\Program Files\nsoftware\BizTalk Adapters 2016\aspx\cs
To host the application in IIS start Internet Information Services (IIS) Manager. Create a new application and specify the Physical Path. The Physical Path should be the aspx\cs folder of the install, as above.
In order for the application hosted in IIS to have access to the BizTalk database the application pool in which the application runs MUST have appropriate permissions. You may either create a new application pool with an identity that is a member of the BizTalk Isolated Host Users group, or otherwise configure the application pool so that it has access to contact the BizTalk database.
To verify the HTTP endpoint is configured and can be accessed visit the page in a web browser: http://localhost/ipbaspx4-cs/as4server.aspx
AS4Web Receive Adapter Properties
After configuring the HTTP endpoint and hosting it in IIS, a receive location must also be configured in the BizTalk Administration Console. The following is a list of common properties and their meanings. For detailed information please reference the help file included with the adapters.
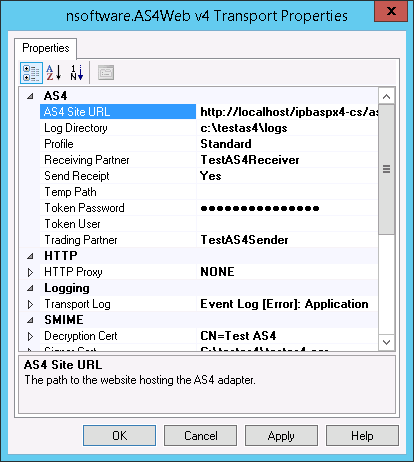
AS4 Site URL
This is the URL of the HTTP endpoint. For instance http://localhost/ipbaspx4-cs/as4server.aspx.
Log Directory
The directory in which log files are created. The adapter will create log files that detail each transmission. To enable more verbose logging set the Transport Log Log Mode to Verbose.
Receiving Partner
The AS4 Id of the receiving partner. This should be set to your Id. The adapter will match the incoming request against this value to verify
that the request was intended for you.
Send Receipt
This property indicates whether a receipt should be sent after downloading files. The default is True.
Trading Partner
The AS4 If of the sending partner. This should be set to your partner's Id. The adapter will match
the value in the incoming request to verify it was sent from the expected partner.
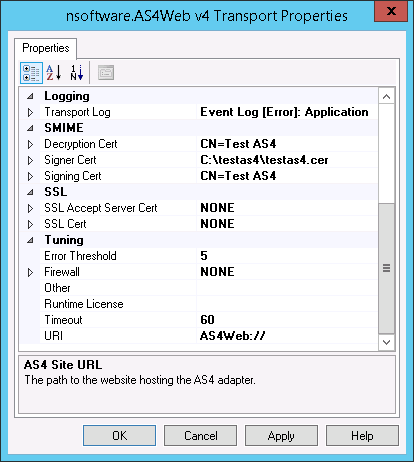
Decryption Cert
This is the certificate with private key which will be used to decrypt incoming messages. Click the ellipses to open the Certificate Selector Dialog.
Select the PFX Store tab and browse to the certificate with private key. For instance the "testas4.pfx" file mentioned above. Specify the passphrase and click the Open button (the test certificate does not have a password). The subject of the certificate (CN=Test AS4) will be visible. Highlight the subject by clicking on it and then click the OK button. The Certificate Selector Dialog should look like this:
Once closed the value of the Encryption Cert property should be CN=Test AS4. Your trading partner must configure the corresponding public certificate so that they will be able to encrypt messages to send to you. This also applies to the Signing Cert property so they can verify signatures created by the adapter.
Signer Cert
This is the public certificate obtained from your trading partner. This is used to verify the signature of incoming messages. In this tutorial
both the sender and receiver will be using the same digital id and corresponding certificate.
Click the ellipses button to open the certificate selector dialog. Notice that the PFX Store option is not available. This is because
Signer Cert requires only a public certificate (not a certificate with private key).
Select the Public Key / Certificate tab and browse to the testas4.cer file. Click the Open button to load the certificate. The Certificate Selector should look like this:
Once closed you should see the value of Signer Cert as C:\testAS4\testas4.cer.
Signing Cert
The Signing Cert specifies the certificate with private key used to sign the request made to the server, and
also to sign outgoing receipts. In many cases this is the same as Decryption Cert.
Finish
The AS4Web Receive Adapter is now configured. Click OK to close the adapter properties window.
Conclusion
This article demonstrates the use of the AS4 adapter in particular, but /n software provides a full set of adapters for connecting to various types of internet servers. The adapter properties are kept to a minimum for simplicity, but we make an effort to provide those properties that are necessary for effective control over configurations.
Please contact support@nsoftware.com with any questions.
We appreciate your feedback. If you have any questions, comments, or suggestions about this article please contact our support team at kb@nsoftware.com.