
Manage Exchange Server Remotely With PowerShell Server

Introduction
Microsoft Exchange contains the Exchange Management Shell which is built on Windows PowerShell technology. The Exchange Management Shell contains a command-line interface, a PowerShell snap-in, and the Exchange Cmdlets which allow you to perform numerous administrative tasks via scripts.
This tutorial will cover setting up the PowerShell Server, connecting to the server, and running Exchange commands. Please note that this tutorial does not provide steps on how to setup Microsoft Exchange or how to perform extensive adminstrative tasks. Rather it provides information about creating a secure SSH connection (using the PowerShell Server), so that you can remotely manage Exchange using the Exchange Cmdlets.
Prerequisites
The first step is to install Microsoft Exchange. This tutorial does not cover the necessary steps needed to install Exchange, but there are a variety of tutorials on the web that provide detailed steps about this process. Microsoft’s TechNet site contains detailed information about Exchange, which you may find helpful.
Once you have Microsoft Exchange installed, you will then want to download and install the PowerShell Server on the same machine where you have Exchange installed.
Setting up the PowerShell Server
For the sake of this tutorial, we are going to use the default connection settings for the server (i.e. port number 22 and password authentication). Therefore you should not have to make any adjustments to the settings, after it is installed, to make the initial connection. First thing you will need to do is open the PowerShell Server. This can be done by running the “PowerShellServer.exe” file, which can be accessed from either the Start Menu (under PowerShell Server) or from the installation directory (the default location is: C:\Program Files\nsoftware\PowerShell Server 2016). Once the server window is displayed, you can start the server by clicking the “Start” button in the top left corner of the window. The server should now be started and waiting for connection requests.
Note you can adjust the connection settings accordingly based on your requirements. More information about the various settings and configurations can be found within the help file installed along with the server.
Connecting to PowerShell Server
Now that the PowerShell Server is listening for connections, you will want to start an SSH client on a remote machine. In this tutorial, I used PuTTY to connect and execute commands on the PowerShell Server. However you can use a variety of SSH clients such as our SSH Components.
First you will want to run PuTTY and enter the server Host Name where the PowerShell Server is running. You will also want to ensure that Port is set to 22 (provided that you have not altered the setting within the PowerShell Server) and that the Connection Type is set to SSH.
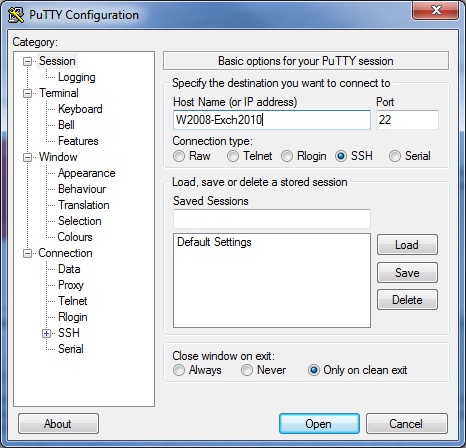
You can then click “Open”, which starts the connection to the PowerShell Server. Note you will see a message window asking you if you would like to accept the server certificate or not (provided that the server certificate is not already trusted by your machine). By default the server’s certificate will most likely not be trusted, as the server is using a self-created test certificate. Therefore you will want to select “Yes” to trust the certificate. You will then be prompted for a login name, which by default will be a user contained within the Administrators group on the machine where the PowerShell Server is running. Therefore you can enter the login name in the form: [Domain][Username]. You will then be prompted to specify the password for the entered login name. If the login was successful, you will see the Login Banner displayed along with a PowerShell-like prompt. You can then begin entering PowerShell commands to be run on the remotely connected machine.
Running Exchange Cmdlets
Now that we are successfully connected to the PowerShell Server, we can begin to work with the Exchange Cmdlets to remotely manage an Exchange Server. The Exchange Cmdlets are not loaded by default when a new instance of PowerShell is started. Therefore we will first need to add the snap-in for the Cmdlets. This can be done by executing the Add-PSSnapin cmdlet.
For Exchange 2007:
Add-PSSnapin Microsoft.Exchange.Management.PowerShell.Admin
For Exchange 2010:
Add-PSSnapin Microsoft.Exchange.Management.PowerShell.E2010
For Exchange 2013:
Add-PSSnapin Microsoft.Exchange.Management.PowerShell.SnapIn
This will then add the Exchange Cmdlets to the current PowerShell instance.
Note that the PowerShell Server also supports profile execution. Therefore if you do not wish to manually add the Exchange Cmdlets with each connection, you may want to add them to a profile. For example, to add the snap-in to each new interactive session initiated with the PowerShell Server, you can create a file called nsoftware.PowerShell_profile.ps1. This file should be created in the location where all the PowerShell profiles are stored (the default location is: C:\Users\[User]\Documents\WindowsPowershell). Within this file you can add the needed Add-PSSnapin command (listed above). Now the Exchange Cmdlets will be added to each new interactive session created with the PowerShell SSH Session, thus you will no longer have to manually add the snap-in!
Now that they are added you can begin running Exchange Cmdlets, such as Get-Mailbox and New-Mailbox, to remotely manage Exchange! Below is a PuTTY Terminal window displaying a session in which the Get-Mailbox and New-Mailbox cmdlets were executed.

When running an Exchange Cmdlet, you may come across an error similar to
Active Directory operation failed on W2008-Exch3010.Exchange2010.DN. The supplied credential for EXCHANGE2010\Administrator on Bind operation is invalid.
By default, the PowerShell Server uses impersonation. Access to resources are often restricted when impersonation is used, which results in an error similar to the one mentioned above. You can configure the PowerShell Server to not use Impersonation.To turn off Impersonation, navigate to the Other tab and uncheck the “Enable Impersonation” checkbox. Restart the server for the change to take effect.

You can view all the connection steps and any commands executed, by viewing the PowerShell Server logs. Note that the Log Mode was set to “Verbose” in the picture below (thus showing extensive logging information). The various Log Modess will display different amounts of information, depending on what is selected. You can change the Log Mode by selecting the “Other” tab within the PowerShell Server window and choosing the desired option within the “Log Mode” drop-down list.

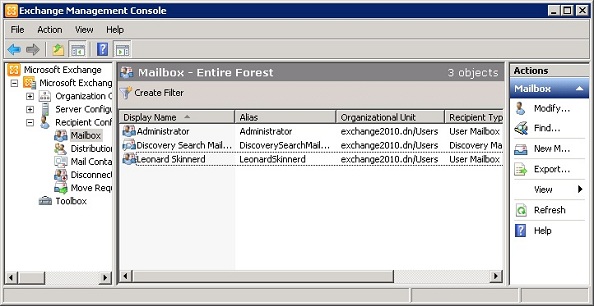
After the New-Mailbox Cmdlet was completed successfully, you can then navigate to the Exchange Management Console (on the server where Exchange is installed) to view the newly created mailbox. In the picture below, you can see that a User Mailbox is now displayed for “Leonard Skinnerd”.
This tutorial only demonstrates a couple of the basic Exchange Cmdlets that can be executed remotely using a secure SSH connection. However there are many additional cmdlets that will help you manage your Exchange Server. There is a wealth of information and examples available for each cmdlet. One such resource is Microsoft’s TechNet site.
Tips and Troubleshooting
- The term ‘Get-Mailbox’ is not recognized as the name of a cmdlet, function, script file, or operable program. Check the spelling of the name, or if a path was included, verify that the path is correct and try again.
This error occurs when the Exchange Cmdlets snap-in has not been added to the PowerShell instance. For details about how to add the Exchange Cmdlets snap-in, please see the Running Exchange Cmdlets section of this tutorial.
- Get-Mailbox Active Directory operation failed on W2008-Exch3010.Exchange2010.DN. The supplied credential for ‘EXCHANGE2010\Administrator’ on Bind operation is invalid.
Access if often restricted when impersonation is used, in which case you will see the above error. To turn off Impersonation, navigate to the Other tab and uncheck the “Enable Impersonation” checkbox. Restart the server for the change to take effect.
- Get-Mailbox : Value cannot be null.
Parameter name: parameters
This error can occur when using impersonation. To turn off Impersonation, navigate to the Other tab and uncheck the “Enable Impersonation” checkbox. Restart the server for the change to take effect.
We appreciate your feedback. If you have any questions, comments, or suggestions about this article please contact our support team at kb@nsoftware.com.