
Getting started with Zip, Bzip2, and Gzip in MuleSoft
Requirements: /n software Connectors for MuleSoft
Introduction
The /n software Connectors for MuleSoft are pure java Connectors which integrate directly into AnyPoint Studio (and your Mule application). The /n software Connectors for MuleSoft extend the functionality of MuleSoft and provide robust enterprise-ready Internet connectivity, secure messaging, and file transfer.
Our Zip, Bzip2, and Gzip modules add advanced file compression and decompression functionality to your Mule application. There are many different connectors currently supported: AS4 for EDI, FTPS, FTP, SFTP, SSH, Email, etc. For details on installation and other connectors please see the Online Documentation.
This guide will walk you through getting started with the Zip, Bzip2 and Gzip modules. In most cases configuration is as simple as wiring up the input.
Contents
Zip Module
No configuration is required for the module itself. Additional settings for a more granular level of control may be configured in the properties page. Check out the Online Documentation for more information about the optional properties.
Zip Compressor Usage
For simplicity we will walk through getting started with the Zip Compressor and built-in File List connector. The key to getting started is to create a mapping of filenames to file data in the message payload before it arrives at the Zip Compressor.

First, add a File List connector to your flow and configure it to point to a particular Directory Path.
Second, transform the File List output into a Map<Filenames, Bytes>. The output of the File List connector must be transformed before it can be used with the Zip Compressor. The reason for this is, the Compressor expects the filename and file data be present in the input payload as key:value pairs.
The easiest way to transform the File List output is to add a Set Payload connector following the File List connector.

In the Value of the Set Payload connector, click the Mule expression indicator to add in DataWeave script. The following DataWeave script will reduce the File List output down to the filename and file data for the Zip Compressor.
output application/java
---
(0 to sizeOf(payload) - 1) as Array
reduce (index, acc={}) ->
acc ++ { (payload[index].attributes.fileName): payload[index].payload}
That is all that is required to configure the input for the Zip Compressor.
When the Compressor finishes processing, the output message payload contains the archive file. Simply pass this to a File Write connector to write it to disk or to another connector for further processing, transmission, or storage.
Below is sample configuration XML for getting started.
The above sample uses the DataWeave reduce operator. The reduce operator applies a lambda function to each element of the given array. In this case, the lambda function applies to each element of the File List output and concatenates a new object onto the accumulator acc each iteration. Each element corresponds to a filename and content. For more information about the reduce operator and lambda functions see transforming objects with DataWeave.
Zip Decompressor Usage
For simplicity we will walk through getting started with the Zip Decompressor and built-in File Read connector. All that is necessary to get up and running is to read in an archive file.
First, drag an instance of the File Read connector into a Mule project and configure it to read in a particular archive file.
Second, drag an instance of the Zip Decompressor behind the File Read connector. There is no need to transform the output data of the File Read connector before passing it to the Decompressor. That is all that is required to configure the input of the Decompressor.
When the module completes its work, a Map with the filename and decompressed content as key:value pairs is generated in the output payload. It is up to you to transform the output for further processing.
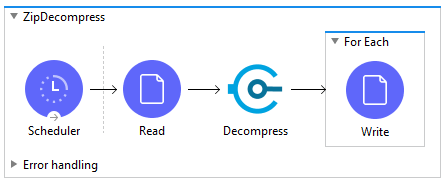
As an example, if you would like to write the decompressed files to disk then you will need to iterate through the payload elements and write them to disk one by one. You can easily do this by adding a For Each Scope behind the Decompress module. Configure the For Each Scope to iterate over the message payload.
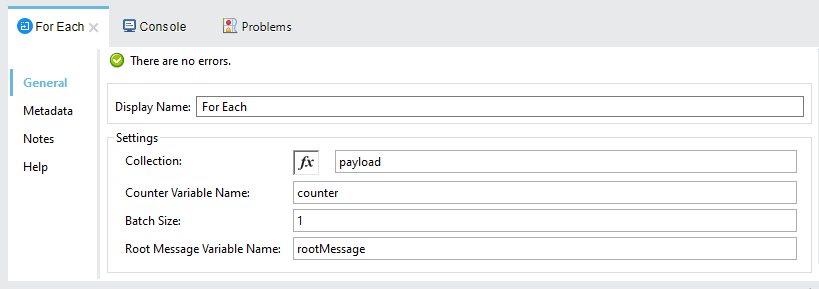
The For Each scope will iterate over the elements of the Decompressor output collection. The elements will be processed one-by-one. Inside the For Each scope, add a File Write connector. The File Write connector will need to capture the filename and file data in the current element and write them to disk. Below are the steps to accomplish this.
In the Path property of the File Write connector, paste in the following DataWeave code:
output application/json
---
"c:/temp/mule/output/" ++ (payload pluck $$$)[0]
In the Content property of the File Write connector, paste in the following DataWeave code:
output application/java --- ( payload pluck $ )[0]
That is all that is required to configure the Zip Decompress module to write the files to disk.
Below is sample configuration XML for getting started.
The above sample uses the $$ keyword which signifies "the current key". The $ keyword signifies "the current value". See the MuleSoft documentation for pluck and DataWeave Operators for more information.
Bzip2 Module
No configuration is required for the module itself. Additional settings for a more granular level of control may be configured in the properties page. Check out the Online Documentation for more information about the optional properties.
Bzip2 Compressor Usage
For simplicity we will walk through getting started with the Bzip2 Compressor and built-in File List connector. The key to getting started is to create an Array of file content in the message payload before it arrives at the Bzip2 Compressor
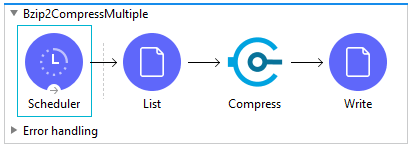
First, add a File List connector in front of Bzip Compress module in your flow and configure it to point to a particular Directory Path. There is no need to transform the output of the File List connector before passing it to the Bzip2 Compressor.
Second, add a Bzip2 Compress module behind the File List connector. That is all that is required to configure the input for the Compressor.
The Bzip2 Compressor takes in an Array of file data as input (E.g. [data1, data2, ...]) and generates a stream of compressed data to the payload of the Mule message. You can write the output file to disk with a File Write connector or pass it to another connector for further processing.
Below is sample configuration XML for getting started.
Bzip2 Decompressor Usage
For simplicity we will walk through getting started with the Bzip2 Decompressor and built-in File Read connector. All that is necessary to get started is to provide the File Read output directly to the BZip2 Decompressor.
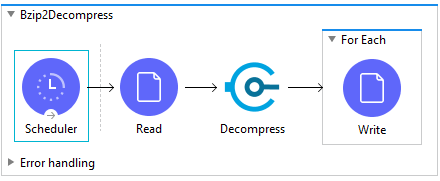
First, add a File Read connector to your flow and configure it to point to a particular bzip2 formatted file.
Second, add a Bzip2 Decompressor behind the File Read connector. That is all that is required to configure the input for the Decompressor.
The module will decompress the input data into an Array of decompressed content and write it to the payload of the mule message. It is up to you to transform the output for further processing.
As an example, if you would like to write the decompressed data to disk then you will need to iterate through the payload elements and write them to disk one by one. You can use a For Each Scope behind the Decompress module to iterate through the output array. As a note, bzip2 is a data compression algorithm, not a file archiver. Thus there are no inner filenames and filenames are not preserved in the specification.
Below is sample configuration XML for getting started.
Gzip Module
No configuration is required for the module itself. Additional settings for a more granular level of control may be configured in the properties page. Check out the Online Documentation for more information about the optional properties.
Gzip Compressor Usage
For simplicity we will walk through getting started with the Gzip Compress Single module and built-in File Read connector. All that is necessary to get up and running is provide the File Read output directly to the Gzip Compressor.
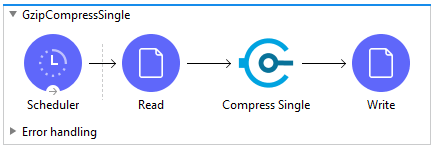
First, add a File Read connector to your flow and configure it to read a file. There is no need to transform the output of the File Read connector before passing it to the Gzip Compressor.
Second, add a Gzip Compress Single module behind the File Read connector. That is all that is required to configure the input for the Compressor.
The Gzip Compress Single module will take in binary file data and generate compressed data. The compressed data will be written to the payload of the Mule message. You can then write it to disk with a File Write connector or pass it to another connector for further processing.
Below is sample configuration XML for getting started.
Gzip Decompressor Usage
For simplicity we will walk through getting started with the Gzip Decompress Single module and built-in File Read connector. All that is necessary to get up and running is provide the File Read output directly to the Gzip Decompressor.
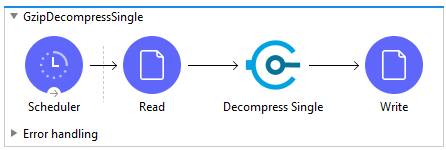
First, add a File Read connector to your flow and configure it to read in a gzip formatted file.
Second, add a Gzip Decompress Single module behind the File Read connector. That is all that is required to configure the input for the Decompressor.
The module will decompress the input data into a decompressed stream of bytes and write it to the payload of the mule message. You can then write it to disk with a File Write connector or pass it to another connector for further processing.
Below is sample configuration XML for getting started.
We appreciate your feedback. If you have any questions, comments, or suggestions about this article please contact our support team at kb@nsoftware.com.