
OFTP Adapter for Microsoft BizTalk
Requirements: /n software Adapters for Microsoft BizTalk
Introduction
The /n software Adapters for Microsoft BizTalk include fully-managed .NET Adapters that seamlessly integrate with the BizTalk Messaging Pipeline. The /n software Adapters extend the features of BizTalk with advanced Internet communications and secure messaging capabilities.
There are many different BizTalk adapters currently supported: AS2 Adapters for EDI communications, FTPS, FTP, SFTP, SSH, OFTP, Email adapters, etc. These adapters have completed the official adapter certification program (administered by Unisys) established by Microsoft for BizTalk server, which tests for scalability and interoperability with Microsoft BizTalk Server.
This guide will focus specifically on the OFTP adapter, which is used to both send and receive files over the Odette File Transfer protocol. Before you continue reading, I recommend that you go ahead and download the product and follow along with me through the tutorial.
Contents
Adapter Installation
Before installing you should stop the BizTalk host instance and close the BizTalk Administration Console. After you run the setup application, all of the necessary files will be installed on your system. The adapters will automatically be added to the BizTalk Administration Console, so we can begin using them in send ports and receive locations. If you open the BizTalk Administration Console and create a new receive location or send port, you'll see that the /n software OFTP 2016 adapter is now available as a transport type.
Receive Location Configuration
In this tutorial we will be using the /n software BizTalk OFTP Adapter in conjunction with the standard File adapter to send and receive files over OFTP. For the purposes of this demo we will create a file structure like so:
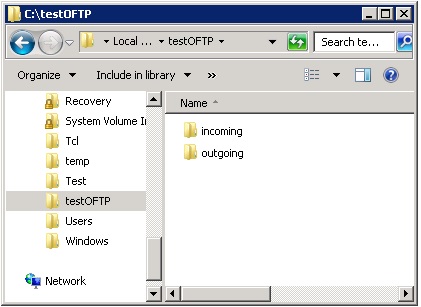
As you can see we have a directory for files that are outgoing (to be sent) and files that are incoming (received).
Next we will create a new receive location named "testOFTP.Receiver" with a transport type of "nsoftware.OFTP 2016". Below is a list of properties and the values which we will supply for this tutorial. We will use a test certificate which you can obtain here.
The following properties are common to both the OFTP Receiver and the OFTP Transmitter.
OFTP Server
This is the IP address or Domain Name of the OFTP server.
OFTP Port
This is the port that the OFTP Server is listening on. The default value is 3305. This must be set when using SSL, where the default port is 6619.
Client SSID Code
This is the identification code of the client. This code may be less than, but no more than 25 characters in length. Generally, SSID codes
have the following format as specified in RFC 2204, based on ISO 6523:
| Code Identifier | 'O' - Indicates ODETTE assigned the Organization Identifier. Other values can be used for non-ODETTE codes. This field is a fixed length of 1 character. |
| International Code | A code forming part of the Organization Identifier. This field may be of variable length up to 4 characters. |
| Organization Code | A code forming part of the Organization Identifier. This field may contain the letters A to Z, the digits 0 to 9, and space and hyphen characters. This field may be of variable length up to 14 characters long. |
| Computer Sub-Address | A locally assigned address which uniquely identifies a system within an organization (defined by an Organization Identifier). This field may be of variable length up to 6 characters long. |
Client SFID Code
This code is usually the same as the SSID code specified in Client SSID Code. However, when a company has more than one entity, they may have
a different SFID code for each entity in the company.
Client Password
This is the password assigned to the client. This property must be a string of no more than 8 characters in length.
Server SSID Code
This is the identification code of the server. This code may be less than, but no more than 25 characters in length. Generally, SSID codes
have the following format as specified in RFC 2204, based on ISO 6523:
| Code Identifier | 'O' - Indicates ODETTE assigned the Organization Identifier. Other values can be used for non-ODETTE codes. This field is a fixed length of 1 character. |
| International Code | A code forming part of the Organization Identifier. This field may be of variable length up to 4 characters. |
| Organization Code | A code forming part of the Organization Identifier. This field may contain the letters A to Z, the digits 0 to 9, and space and hyphen characters. This field may be of variable length up to 14 characters long. |
| Computer Sub-Address | A locally assigned address which uniquely identifies a system within an organization (defined by an Organization Identifier). This field may be of variable length up to 6 characters long. |
Server SFID Code
This code is usually the same as the SSID code specified in Server SSID Code. However, when a company has more than one entity, they may have a different SFID
code for each entity in the company.
Server Password
This is the password assigned to the server in the bilateral agreement. This property must be a string of no more than 8 characters in length.
Certificate
This will be your digital id which will be used to perform different operations such as session authentication, signing a file or receipt, or decrypting a file.
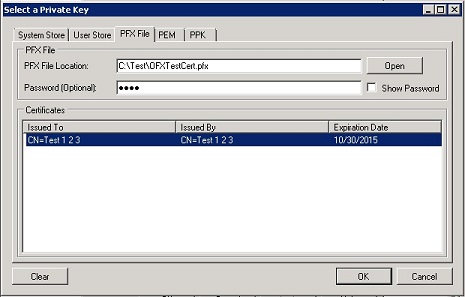
If you place the cursor in the textbox a button with ellipses will be visible. Clicking this button will open the Certificate Selector Dialog.
Select the tab corresponding to the certificate store (e.g., PFX File, PEM, etc) and browse to the digital id you will be using. Specify the passphrase and click
the Open button. You will see the subject of the certificate listed below. Highlight the subject by clicking on it and then click the OK button.
The Certificate Selector Dialog should look similar to this:
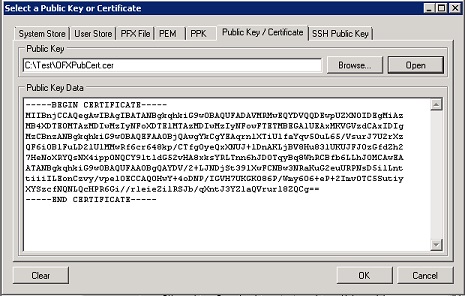
Recipient Cert
This will be the certificate used when verifying signed files and receipts, as well as encrypting files to be sent. This property must be set when
SecureAuthentication has been set to true. If you place the cursor in the textbox a button with ellipses will be visible. Clicking this button will open the
Certificate Selector Dialog.
Select the tab corresponding to the certificate store (e.g., PFX File, PEM, etc) and browse to the certificate you will be using, then click the Open button.
You will see the subject of the certificate listed below. Highlight the subject by clicking on it and then click the OK button.
The certificate selector Dialog should look similar to this:
Secure Authentication
This controls whether or not the adapter will perform secure Odette authentication. Secure authentication consists of encrypting and decrypting data sent to and
from the server and verifying that this occurred successfully. Both Certificate and Recipient Cert must be set when this property is true.
This is only valid for version 2.0 of the protocol.
Version
This controls the version of the OFTP protocol used by the adapter. The default version is OFTP 1.2.
OFTP version 2.0 must be used when using any security functions. Use SSL, Secure Authentication, Virtual File Security Level, and Compress
are only valid for OFTP version 2.0.
Note: Temp Path must be set when OFTP version 2.0 is used.
Finish
We have now successfully specified the certificate and digital ids the OFTP Receive Adapter will use, as well as the Client and Server identification information (SSID, SFID).
At this point click OK to close the adapter properties window. The URI of your receive location should be: OFTP://<ClientSSID>@<OFTPServer>:3305
You should now create a new Send port of type File. We will name this send port testOFTP.Receive.File. The destination folder for this send port should be C:\testOFTP\incoming. We will specify a filter of BTS.InboundTransportLocation == OFTP://<ClientSSID>@<OFTPServer>:3305 to correspond with the receive location we just created.
Send Port Configuration
We will now create a new send port named "testOFTP.Sender" with a transport type of "nsoftware.OFTP 2016". As before most of the default values are valid, and we will only change the values of the properties listed below.
Many of the properties for the OFTP Sender are the same as the OFTP Receiver. Please see the OFTP Receive Location Properties for information on these properties. We will discuss only those properties specific to the OFTP Send Adapter below.
SignedReceipt
This determines whether the file receipt should be signed by the OFTP server when sending a file to a trading partner. When this receipt is received by the adapter,
it will be verified during processing.
Note: If the server does not attach the public certificate in the signed message, the server's public key must be specified in the Signer Cert property in order
for verification to succeed.
Virtual File Date
This property specifies the date/time stamp for the virtual file before sending. If this is not set when sending a file then the current date/time will be used. Please see the
OFTP Transmit Adapter Help Documentation for valid date formats.
Virtual File Format
This specifies the format for the virtual file being sent. Please see the OFTP Transmit Adapter Help Documentation for valid formats.
Virtual File Name
This is the virtual name of the file that is being sent to the server. If this property is an empty string, the adapter will send the source file's name as the virtual filename.
Note: By default, this property is set to "%SourceFilename%", which is a macro that returns the original name of the file.
Virtual File Security Level
This property specifies the level of security for the file to send. When encrypting a file, Recipient Cert must be set, and when signing a file the Certificate
property must be set. The file will be processed to a temporary file before being sent, thus the Temppath property is required when encrypting or signing a file. Please
see the OFTP Transmit Adapter Help Documentation for valid options.
Note: This is only valid for version 2.0 of the OFTP protocol.
Finish
At this point all of the necessary properties have been set and we can click ok to close the adapter properties window. The URI of the send port should be:
OFTP://<ClientSSID>@<OFTPServer>:3305/<ClientSFID>
As before we'll set up a corresponding receive location of type File to pick up files from disk that will be sent to our trading partner. We'll call this location testOFTP.Send.File and specify a receive folder of C:\testoftp\outgoing. We'll use the URI of this receive location to add a filter to the OFTP send port we just created. The filter will be BizTalk.InboundTransportLocation == OFTP://<ClientSSID>@<OFTPServer>:3305/<ClientSFID>
We are now ready to begin sending and receiving files with our trading partner. You should now be able to enable the testOFTP.Send.File and testOFTP.Receiver receive locations as well as starting the testOFTP.Receive.File and testOFTP.Sender send ports to being trading with your partner. Files dropped into the C:\testoftp\outgoing folder will be sent to the OFTP server while received files will be received to the C:\testoftp\incoming folder.
Conclusion
This article demonstrates the use of the OFTP adapter in particular, but /n software provides a full set of adapters for connecting to various types of internet servers. The adapter properties are kept to a minimum for simplicity, but we make an effort to provide those properties that are necessary for effective control over configurations.
We appreciate your feedback. If you have any questions, comments, or suggestions about this article please contact our support team at kb@nsoftware.com.