
Getting Started with EMV® 3-D Secure
/n software 3-D Secure is a set of development libraries designed to make implementing support for EMV® 3-D Secure, also known as EMV 3DS or 3DS V2, as simple and quick as possible. EMV 3DS offers two primary experiences for the user: browser and mobile. Each environment has specific requirements during processing, and different flows. /n software 3-D Secure provides functionality for both browser based (Server) and mobile based (3DS SDK) flows. The following sections provide guidance on how to use the /n software components to support each of the flows defined by EMV 3DS.
Support for version 2.3.1 of the EMV® 3-D Secure protocol has been added recently. Details on changes and new functionality in this version of the specification can be found in our what's new in 3DS 2.3.1 article.
Contents
- EMV® 3-D Secure Flow
- Connecting with SSL Client Authentication
- Caching CardRanges
- Browser-Based Authentication
- App-Based Authentication
- Additional Functionality
EMV® 3-D Secure Flow
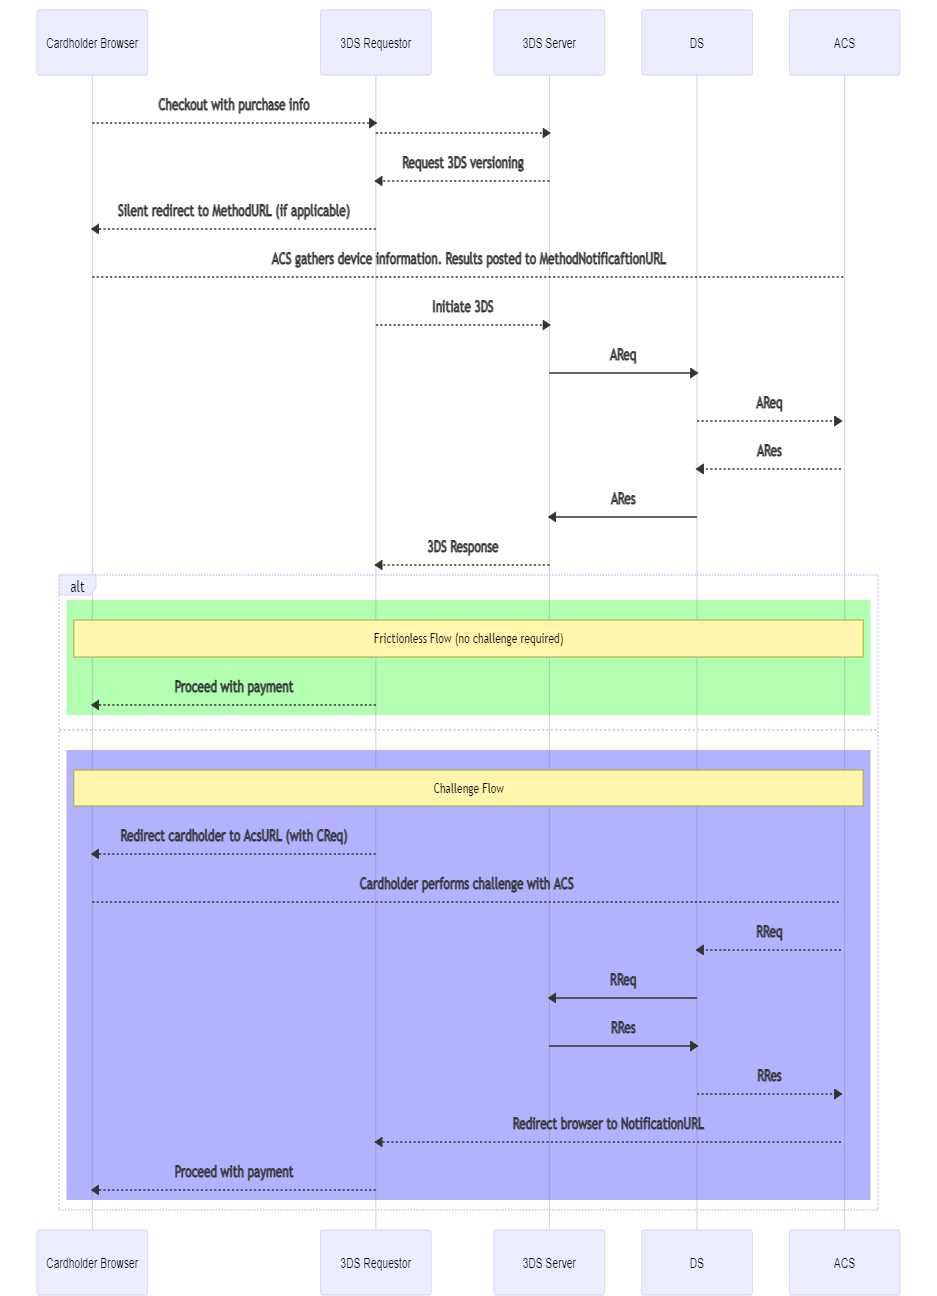
EMV® 3-D Secure offers two primary experiences for the user: browser and mobile. Each environment has specific requirements during processing, and different flows. /n software 3-D Secure provides functionality for both browser based (Server) and mobile based (3DS SDK) flows in the 3DS Server component. The below sequence diagram exhibits a typical browser-based authentication flow for EMV 3DS.
Connecting with SSL Client Authentication
Many directory servers require client authentication via a client certificate. The SSLCert property is used to load the SSL client certificate. In order to properly authenticate to the directory server the entire certificate chain must be presented to the directory server during the initial SSL handshake. The sections below describe options for making sure the CA chain is included.
Option 1: PFX With CA Certs
The first option is to specify a PFX file which includes both the client certificate, and CA certificates. In this case, the component will read the CA certificates from the PFX file and include them in the request.
Option 2: SSLCACerts Configuration Setting
Another option is to specify the CA certificates separately from the client certificate. To do this, the SSLCACerts configuration setting may be set to a CrLf separated list of CA certificates. For instance:
string CA_INT = @"-----BEGIN CERTIFICATE-----
MIIEKzCCAxOgAwIBAgIRANTET4LIkxdH6P+CFIiHvTowDQYJKoZIhvcNAQELBQAw
...
eWHV5OW1K53o/atv59sOiW5K3crjFhsBOd5Q+cJJnU+SWinPKtANXMht+EDvYY2w
F0I1XhM+pKj7FjDr+XNj
-----END CERTIFICATE-----";
string CA_ROOT = @"-----BEGIN CERTIFICATE-----
MIIEFjCCAv6gAwIBAgIQetu1SMxpnENAnnOz1P+PtTANBgkqhkiG9w0BAQUFADBp
...
8ECs48NRSON+/Pqm9Hxw1H3/yz2qLG4zTI7xJVDESZGEXadLwCJXD6OReX2F/BtU
d8q23djXZbVYiIfE9ebr4g3152BlVCHZ2GyPdjhIuLeH21VbT/dyEHHA
-----END CERTIFICATE-----";
Server server = new Server();
server.Config("SSLCACerts=" + CA_INT + "\r\n" + CA_ROOT);
Option 3: PEM With CA Certs
A PEM formatted certificate which also includes CA certificates may also be specified. For instance the PEM file being loaded may have a structure like:
Bag Attributes
  Microsoft Local Key set: <No Values>
  localKeyID: 01 00 00 00
  friendlyName: te-0363d475-2ebe-48b1-9d9f-ea8cfb07b126
  Microsoft CSP Name: Microsoft RSA SChannel Cryptographic Provider
Key Attributes
  X509v3 Key Usage: 10
-----BEGIN PRIVATE KEY-----
MIIEvQIBADANBgkqhkiG9w0BAQEFAASCBKcwggSjAgEAAoIBAQDb1RX3CYoztcwf
...
JX/XQWa1OItqrewBtxfGeQCEvvnZhyXcq7nzcmD4JrXuxfc9dFy5K7foDcQ6BWbM
9oDdzr2/+19vs5WabbBJGUo=
-----END PRIVATE KEY-----
Bag Attributes
  localKeyID: 01 00 00 00
  friendlyName: Visa3DS
subject=/C=US/ST=NC/L=Chapel Hill/O=nsoftware/OU=3DS/CN=mail2.nsoftware.com
issuer=/CN=VBVTESTSUITE2_RSA_CA_CTE/OU=VBVTESTSUITE/O=VISA/L=Denver/ST=Colorado/C=US
-----BEGIN CERTIFICATE-----
MIIDdzCCAl+gAwIBAgIVANc/jXXrtQF1sbQaW4KKpku8w52KMA0GCSqGSIb3DQEB
...
/aNMmRJUNxoWX3gViV/laT8oNQmwde2+/JX1
-----END CERTIFICATE-----
Bag Attributes: <Empty Attributes>
subject=/C=US/O=Visa/OU=Visa International Service Association/CN=Visa ecommerce QA
issuer=/C=US/O=Visa/OU=Visa International Service Association/CN=Visa ecommerce QA
-----BEGIN CERTIFICATE-----
MIIEFjCCAv6gAwIBAgIQetu1SMxpnENAnnOz1P+PtTANBgkqhkiG9w0BAQUFADBp
...
d8q23djXZbVYiIfE9ebr4g3152BlVCHZ2GyPdjhIuLeH21VbT/dyEHHA
-----END CERTIFICATE-----
Bag Attributes: <Empty Attributes>
subject=/CN=VBVTESTSUITE2_RSA_CA_CTE/OU=VBVTESTSUITE/O=VISA/L=Denver/ST=Colorado/C=US
issuer=/C=US/O=Visa/OU=Visa International Service Association/CN=Visa ecommerce QA
-----BEGIN CERTIFICATE-----
MIIEKzCCAxOgAwIBAgIRANTET4LIkxdH6P+CFIiHvTowDQYJKoZIhvcNAQELBQAw
...
eWHV5OW1K53o/atv59sOiW5K3crjFhsBOd5Q+cJJnU+SWinPKtANXMht+EDvYY2w
F0I1XhM+pKj7FjDr+XNj
-----END CERTIFICATE-----
Option 4: CA Certs in Windows Store
When running on Windows the CA certificates will also be included in the request if they are present in the Personal store of the user under which the application is running. Note that this option will not work with Java editions.
Caching CardRanges
The Server component's RequestCardRanges method can be used to retrieve card ranges and additional information from the directory server.
When a transaction is initiated, the first step that should be taken is to find information about the card range to which the card number belongs. This includes the protocol version(s) supported by the ACS and DS, and if one exists, any corresponding Method URL (used in the browser flow).
Results of this method should be cached in order to quickly look up information when processing transactions. It is recommended to call this method once every 24 hours at a minimum, and once per hour as a maximum to refresh the cache. The component will not cache the returned values; it is up to the user to cache these values in an appropriate location.
The first time this method is called, SerialNumber will be empty, indicating that all results should be returned. This is an offset the server will use to return only new updates to the card ranges (if any) since the last request. The SerialNumber will be populated after this method returns, and this value should be saved to be used in subsequent calls.
When a response is received, the card ranges will be made available via the component events and properties.
When ProtocolVersion is set to 2.3.1, the CardRangeData event will fire for each card range data object received, and the Ranges and ACSProtocolInfos properties will be populated to be accessed within the event handler. Optionally, the DS may return a list of URLs that the 3DS Server can use for communication with the DS. If present, these will be available via both the DSURL event and the DSURLs property.
When ProtocolVersion is set to 2.2.0 or 2.1.0, the CardRange event will fire for each card range that is returned, and the results will also be held in the CardRanges property.
The following properties are applicable when calling this method:
- DirectoryServerURL (required) - URL by which to send PReq to DS
- SerialNumber - include if this is not the first call to the method to return only ranges updated since the last call
- ServerTransactionId - generated by component if not included
- ServerOperatorId - set if optionally assigned by DS to 3DS Server
- EnableDownloadCardRangeDataFile (2.3.1 only)
The following properties are populated after calling this method:
- CardRanges - contains a collection of CardRange objects which contain a range of card numbers from Start to End, and an Action indicating whether the range should be added or deleted from the cache the user is maintaining
- SerialNumber - indicates to DS the last time the range cache was updated
- DSTransactionId - assigned by the DS to identify a single transaction
- ResendRequestCardRanges - whether or not to resend the card ranges request
Note that when ProtocolVersion is set to 2.3.1, the card range data is only available using the CardRangeData event.
When using a ProtocolVersion value of 2.2.0 or 2.3.1, the returned ranges may also include ACS Information Indicators. These are used to indicate additional functionality supported for the card range(s). For 2.2.0, a ACSInformationIndicator field is exposed in both the CardRanges collection and the CardRange event. In version 2.3.1, this information is available in the ACSProtocolInfos collection via the Indicator field. This is exposed via a comma separate list of one or more of the following values:
- 01 - Authentication Available at ACS
- 02 - Attempts Supported by ACS or DS
- 03 - Decoupled Authentication Supported
- 04 - Whitelisting Supported
- 05 - Device Binding Supported (2.3.1 only)
- 06 - WebAuthn Authentication Supported (2.3.1 only)
- 07 - SPC Authentication Supported (2.3.1 only)
- 08 - Transaction Risk Analysis Exemption Supported (2.3.1 only)
- 09 - Trust List Exemption Supported (2.3.1)
- 10 - Low Value Exemption Supported (2.3.1)
- 11 - Secure Corporate Payments Exemption Supported (2.3.1)
- 80-99 - Reserved for DS Use
If an error is identified with the card range data received from the directory server when calling the RequestCardRanges method, the ResendRequestCardRanges configuration setting will be true, indicating that the request should be resent. When resending, if SerialNumber was specified for the initial request, it should be set to an empty string before calling RequestCardRanges again. Otherwise, the request can be sent without the serial number again, but the server may respond with an error due to multiple requests within an hour.
The following is an example of using the RequestCardRanges method:
// No SerialNumber specified; all results will be returned
server.RequestCardRanges();
// Access results via event (fires once for each CardRange returned)
void server_OnCardRange(Object sender, ServerCardRangeEventArgs e) {
	String Start = e.RangeStart;
	String End = e.RangeEnd;
	String Action = e.RangeAction;
	String ACSStartProtocolVersion = e.ACSStartProtocolVersion;
	String ACSEndProtocolVersion = e.ACSEndProtocolVersion;
	String MethodURL = e.ThreeDSMethodURL;
	// ... cache results
}
// Event used when retrieving ranges using ProtocolVersion 2.3.1
// (Fires once for each card range data object returned)
void server_OnCardRangeData(Object sender, ServerCardRangeDataEventArgs e) {
	String Action = e.RangeAction;
	String CountryCode = e.IssuerCountryCode;
	int DSProtocolVersions = e.DSProtocolVersions;
	// Check the server.Ranges collection for information on which ranges
	// the event is fired.
	// Check the server.ACSProtocolInfos collection to for protocol versions
	// and other associated information supported by the ACS for the card ranges.
	// ... cache results
}
// Access results via CardRanges property (ProtocolVersion 2.2.0 and 2.1.0)
CardRange FirstRange = server.CardRanges[0];
String Start = FirstRange.Start;
// ... etc, cache results for all ranges returned
Note that retrieving card ranges can consume a lot of memory, especially when retrieving the initial set of ranges. The StoreCardRangeData and UseJsonDOM configuration settings can be set to help minimize the amount of memory used. A CardRangeTempPath setting can also be used to specify a temporary path to which the PRes packet will be temporarily written prior to parsing.
When using ProtocolVersion 2.3.1, if UseJsonDOM is false, the card ranges will need to be cached and processed after the RequestCardRanges method returns. The card ranges would then need to be processed in the order indicated by the CardRangeRecordsReadOrder configuration setting. A check will also need to be made for overlap of ranges. If issue(s) are found, the ReportCardRangeError configuration setting should be used to report the error to the directory server.
Browser-Based Authentication
In the browser-based flow, a cardholder initiates a transaction on the merchant's website. Information about the cardholder's browser is collected so the ACS can make a determination when SendAuthRequest is called. In the case a challenge is required, communication between the cardholder and the ACS takes place within the customer's browser and the results are then communicated back to the merchant site.
Pre-Authentication Method Invocation
When a transaction begins, the CardRanges cache should be queried to find details about the card range to which card number belongs. If a CardRanges.MethodURL is defined for the card range, the GetMethodData method should be used to prepare data to be sent via the cardholder's browser to the CardRanges.MethodURL.
If the CardRanges.MethodURL is not set for the specified card range, set MethodCompletionIndicator to U before calling SendAuthRequest.
Otherwise, set the following properties and use the GetMethodData to generate the method data:
- MethodNotificationURL (required)
- ServerTransactionId
GetMethodData returns a string containing encoded data to be sent to the ACS. This included ServerTransactionId and MethodNotificationURL. This data is then transmitted to the ACS via the cardholder's browser.
As per the EMVCo specification, create a hidden iframe in the browser and send a form with the field name threeDSMethodData containing the return value from this method and post the form to the CardRanges.MethodURL.
The ACS will record information about the customer's environment and then POST back to the MethodNotificationURL. The page at this URL should expect a form variable with the name threeDSMethodData which will contain the original ServerTransactionId value in order to match the response with the request. The form variable value will be base64url encoded and may be passed directly to the CheckResponse method. The component will decode and parse the received value and populate ServerTransactionId with the value from the received data.
If the response from the ACS is not received within 10 seconds, set MethodCompletionIndicator to N before calling SendAuthRequest.
After calling GetMethodData, a request is made to the CardRanges.MethodURL. After this, the ACS will make a POST to MethodNotificationURL to inform the requestor of completion. Retrieve the threeDSMethodData form variable value that was POSTed and pass it to the CheckResponse method. After calling this method, the following properties are populated:
- ServerTransactionId
The ServerTransactionId may be used to match the response with the request.
Sending the Authentication Request
SendAuthRequest begins the 3-D Secure transaction flow by sending an authentication request to the DirectoryServerURL.
After calling this method, check TransactionStatus to determine if the cardholder is authenticated (frictionless flow) or further cardholder interaction is required to complete the authentication (challenge flow).
Prior to calling SendAuthRequest, data must be collected to facilitate fraud checks by the ACS. The following properties are applicable for both app-based and browser-based flows:
- AcceptLanguage (2.3.1 only)
- AcquirerCountryCode (2.3.1 only)
- AcquirerBIN (required)
- AcquirerMerchantId (required)
- BrowserAcceptHeader (required)
- BrowserLanguage (required)
- BrowserJavaEnabled (required in 2.1.0, required in 2.2.0 and 2.3.1 if BrowserJavaScriptEnabled is true)
- BrowserJavaScriptEnabled(not valid in 2.1.0, required in 2.2.0 and 2.3.1)
- BrowserScreenColorDepth(required in 2.1.0, required in 2.2.0 and 2.3.1 if BrowserJavaScriptEnabled is true)
- BrowserScreenHeight (required in 2.1.0, required in 2.2.0 and 2.3.1 if BrowserJavaScriptEnabled is true)
- BrowserScreenWidth (required in 2.1.0, required in 2.2.0 and 2.3.1 if BrowserJavaScriptEnabled is true)
- BrowserTimeZone (required in 2.1.0, required in 2.2.0 and 2.3.1 if BrowserJavaScriptEnabled is true)
- BrowserUserAgent (required)
- CardholderName (required)
- CardNumber (required)
- DirectoryServerURL (required)
- MerchantCategoryCode (required)
- MerchantCountryCode (required)
- MerchantName (required)
- NotificationURL (required)
- PurchaseAmount (required)
- PurchaseDate (required)
- RequestorId (required)
- RequestorName (required)
- RequestorURL (required)
- ResultsURL (required)
- AccountType
- AuthenticationIndicator
- BillingAddress
- BrowserIPAddress
- CardholderEmail
- CardholderHomePhone
- CardholderMobilePhone
- CardholderWorkPhone
- DecoupledMaxTimeout (2.2.0 only)
- DecoupledRequestIndicator (2.2.0 only)
- DeviceChannel
- MessageCategory
- PurchaseCurrency
- PurchaseExponent
- ServerOperatorId
- ServerTransactionId
- ShippingAddress
- ThreeRIIndicator
SendAuthRequest Example:
// Assign mandatory known values
server.RequestorId = "az0123456789"; // assigned by DS
server.RequestorName = "Example Requestor name"; // assigned by DS
server.RequestorURL = "https://threedsrequestor.adomainname.net"; // URL of merchant site
server.AcquirerBIN = "868491"; // assigned by Acquirer
server.AcquirerMerchantId = "mGm6AJZ1YotkJJmOk0fx"; // assigned by Acquirer
server.MerchantName = "Example Merchant Name"; // assigned by Acquirer
server.MerchantCategoryCode = "5411"; // defined by DS
server.MerchantCountryCode = "840"; // defined in ISO 8583
// Browser Information
server.BrowserAcceptHeader = BrowserAcceptHeader;
server.BrowserScreenColorDepth = BrowserScreenColorDepth;
server.BrowserIPAddress = BrowserIPAddress;
server.BrowserJavaEnabledVal = BrowserJavaEnabled;
server.BrowserLanguage = BrowserLanguage;
server.BrowserScreenHeight = BrowserScreenHeight;
server.BrowserScreenWidth = BrowserScreenWidth;
server.BrowserTimeZone = BrowserTimeZone;
server.BrowserUserAgent = BrowserUserAgent;
server.NotificationURL = NotificationURL;
// Cardholder Information
server.CardExpiryDate = "1910";
server.CardNumber = "8944988785642183";
server.CardholderName = "John Doe";
server.BillingAddress.City = "Bill City Name";
server.BillingAddress.Line1 = "123 Fake St.";
server.BillingAddress.State = "CA";
server.BillingAddress.PostalCode = "90210";
server.BillingAddress.Country = "840"; // ISO 3166-1
// ... See documentation for additional cardholder properties
// Purchase Information
server.PurchaseAmount = "1000"; // Decimal is implied, this is $10.00
server.PurchaseCurrency = "840"; // USD
server.PurchaseExponent = "2"; // 2 decimal places
server.PurchaseDate = "20170316141312"; // YYYYMMDDHHmmSS
// Required URLs
server.ResultsURL = "https://threedsserver.adomainname.net"; // URL on merchant site where results will be posted
server.NotificationURL = "https://threesserver.adomainname.net/Notifications"; // Receives notification when challenge is complete
server.DirectoryServerURL = "https://directoryserver";
server.SendAuthRequest();
Authentication Response Handling
After calling SendAuthRequest, the TransactionStatus property holds the result. Possible values are:
| Transaction Status | Description |
|---|---|
| Y | Authenticated successfully |
| C | Cardholder challenge required |
| N | Not authenticated |
| A | Not authenticated, but a proof of authentication attempt was generated in AuthenticationValue |
| U | Not authenticated due to technical or other issue |
| R | Not authenticated because the issuer is rejecting authentication |
| D | Challenge required; decoupled authentication confirmed |
| I | Informational only; 3DS Requestor challenge preference acknowledged |
| S | Challenge using SPC |
If the transaction is authenticated (Y or A), no further steps are required. The flow is considered frictionless and the 3-D Secure processing is complete. If processing a payment, the AuthenticationValue and AuthenticationECI values can be included as proof of 3-D Secure authentication.
If the transaction requires a cardholder challenge (C, D, or S), further steps are required.
If the transaction is not authenticated, TransactionStatusReason may contain details about the reason.
The following properties are applicable after calling this method: - AuthenticationECI - AuthenticationValue - TransactionStatus - TransactionStatusReason - CardholderInformation - ACSURL (if challenge required) - ACSChallengeMandatedIndicator (if challenge required) - AuthenticationType (if challenge required) - DecoupledConfirmationIndicator
If TransactionStatus is C, then additional steps are required to complete the authentication. The GetChallengeRequest method should be called next to obtain data to be sent to the ACSURL in an authentication window in the customer's browser. Once authentication is complete, the ACS will post the results to the ResultsURL value that was specified when calling SendAuthRequest.
If Transaction Status is D, then decoupled authentication has been accepted by the ACS. DecoupledConfirmationIndicator will have a value of Y as well. Authentication will happen outside of the 3-D Secure flow and, when complete, the ACS will post the results to the ResultsURL that was specified when calling SendAuthRequest.
The DecoupledTimeRemaining value, which is calculated based on the DecoupledMaxTimeout value sent in the initial authentication request, can be checked to see the amount of time remaining before decoupled authentication must be completed. If the ACS does not post the results before this value runs out, it can be assumed that decoupled authentication was not successful.
Challenge Interaction
The GetChallengeRequest method is used to build the Challenge Request (CReq) which will be sent in a form post to the ACSURL property, via the cardholder browser.
An iframe should be created in the cardholder's browser, which will be used to send the challenge request and also allow the cardholder and ACS to interact directly.
The size of the challenge window (iframe) may be any of the sizes listed in ChallengeWindowSize. Before calling this method set ChallengeWindowSize to the appropriate value to let the ACS know the size of the window on the cardholder's browser.
Calling this method will return a string which should be placed in a creq form variable.
The SessionData setting may also be set with any data that may be helpful to continue processing the transaction after the final challenge response is received at the NotificationURL. To prepare the session data for submission, query EncodedSessionData. The encoded string may then be placed in the threeDSSessionData form variable.
Note: The maximum length of the threeDSSessionData form variable, after being encoded, is 1024 bytes.
Example Form
Response.Write("<form name='downloadForm' action='" + ACSURL + "' method='POST'>");
Response.Write("  <INPUT type='hidden' name='creq'                value='" + ChallengeRequest + "'>");
Response.Write("  <input type='hidden' name='threeDSSessionData'  value='" + EncodedSessionData + "'>");
Response.Write("</form>");
Response.Write("<script>");
Response.Write("window.onload = submitForm;");
Response.Write("function submitForm() { downloadForm.submit(); }");
Response.Write("</script>");
Server Side Results Notification
When a challenge is completed for both app-based and browser-based flows, a POST is made to the ResultsURL with a Results Request message.
Prior to checking this RReq message, the ServerTransactionId can be extracted using the ExtractRReqServerTransactionId configuration setting. This value can then be used to look up details on the transaction that were saved prior to starting the challenge process, including the messageVersion which must be set via the ProtocolVersion configuration setting prior to passing the RReq message to the CheckResponse method.
Pass the body of the HTTP request received at ResultsURL to the CheckResponse method. This contains information about the results, and asks for a Results Response to be sent back containing the ResultsStatus.
After calling this method the following properties are populated: - AuthenticationECI - TransactionStatus - TransactionStatusReason - ChallengeCancellationIndicator - AuthenticationType - AuthenticationValue
After passing the received RReq message to the CheckResponse method, all the properties required to be set before building the RRes will have been populated except for ResultsStatus, which indicates whether or not the message was successfully received for further processing, or provides more detail to the ACS on why the challenge could not be completed.
Possible values for ResultsStatus include:
| 01 | Results Request Received for further Processing. |
| 02 | Challenge Request not sent to ACS by 3DS Requestor (3DS Server or 3DS Requestor opted out of the challenge. |
| 03 | ARes challenge data not delivered to the 3DS Requestor due to technical error. |
The Server can use the value of the RequestorChallengeInd to determine whether or not a value of 02 is appropriate. It must use the necessary error handling logic when processing ARes messages to determine whether or not a value of 03 is appropriate.
Once ResultsStatus has been set, GetResultsResponse can be called and will return a string containing the reply to be sent in the response. In your HTTP server use the string returned from this method as the body of the reply, and set the Content-Type header to application/JSON charset=utf-8
Final Challenge Response
In a browser-based flow, the challenge takes place directly between the cardholder and the ACS in a separate iframe or window. The ACS will POST the final challenge response to the NotificationURL after the challenge is complete. Retrieve the cres form variable value from the POST data and pass it to CheckResponse. After calling this method the following properties are populated:
- ServerTransactionId
- TransactionStatus
In addition to the cres variable, a threeDSSessionData variable will be present if SessionData was set before calling GetChallengeRequest. The threeDSSessionData value POSTed to NotificationURL may be passed to EncodedSessionData. Query SessionData to get the decoded session data.
SPC-Based Authentication
SPC (Secure Payment Confirmation) provides a method to perform a challenge using preestablished FIDO credentials when using a Browser. The SPC authentication can be initiated by the 3DS Requestor via an extra AReq/ARes message pair or by the ACS via a standard Browser Challenge Flow.
For an SPC authentication to execute correctly, the following prerequisites apply:
- The ACS has an enrolled FIDO authenticator on the device for this Cardholder.
- The 3DS Requestor and/or the ACS have detected that the Cardholder Browser supports the related SPC APIs (allow="payment *; publickey-credentials-get *"). For the ACS, this information can be obtained via the Browser User Agent data element or via data obtained via the 3DS Method.
SPC-based authentication can be enabled with the following additions:
Prior to sending the initial authentication request packet (AReq) using the SendAuthRequest method, the ThreeDSRequestorSpcSupport configuration setting should be set to Y to indicate that SPC is supported by the 3DS Requestor.
If SPC is accepted by the ACS, the resulting TransactionStatus should be S. The response will also contain a list of enrolled FIDO (WebAuthn) credentials associated with the cardholder, and SPC transaction data. This data is available in the following configuration settings:
- WebAuthnCredentialListCount
- WebAuthnCredentialListWebAuthnCredential
- WebAuthnCredListRelyingPartyId
- SPCTransactionAdditionalData
- SPCTransactionChallenge
- SPCTransactionChallengeInfoText
- SPCTransactionCurrency
- SPCTransactionDisplayName
- SPCTransactionIcon
- SPCTransactionIssuerImage
- SPCTransactionIssuerImageDark
- SPCTransactionIssuerImageMonochrome
- SPCTransactionPayeeName
- SPCTransactionPayeeOrigin
- SPCTransactionPSImage
- SPCTransactionPSImageDark
- SPCTransactionPSImageMonochrome
- SPCTransactionTimeout
- SPCTransactionValue
If a new instance of the Server component will be used after authentication to send the second AReq, the AuthenticationInformation value should be saved to be used later.
This information is relayed to the 3DS Requestor implementation, and the 3DS Requestor invokes the SPC authentication (SPC API) against the WebAuthn Credential list. The cardholder authenticates using the FIDO authenticator on their device, and the 3DS Requestor retrieves the Assertion Data from the SPC API call.
The 3DS Server is then configured to includes this FIDO Assertion Data is then included in a new authentication request by setting the ReqAuthData and a ReqAuthMethod of 09. If the AuthenticationInformation value was saved earlier, it can be set via the same configuration setting. If the 3DS Requestor encounters an error during SPC API invocation, this can be indicated using the SPCIncompletionIndicator.
The SendAuthRequest method should then be called again to transmit this data to the ACS (by way of the DS) in a second AReq.
When SendAuthRequest returns, the 3DS Server proceed the same as the regular browser-based flow when the ARes is returned.
When SPC authentication is to be performed, the authentication must be completed within 9 minutes. The component will automatically start an internal timer that can be checked using the CheckSPCTimeout configuration setting. This will return the number of seconds left for SPC authentication to complete. If the time has expired before receiving the Assertion Data from the 3DS Requestor, checking this configuration setting will cause the component to automatically send the second AReq message with an SPCIncompletionIndicator value of 03, indicating that SPC authentication timed out.
Note that SPC-based authentication is only available when a ProtocolVersion of 2.3.1 is used.
App-Based Authentication
In the app-based flow, a cardholder initiates a transaction on a mobile device (Android or iOS) from a 3DS-enabled app (the 3DS Requestor App).
/n software 3-D Secure supports the app-based flow by implementing 3DS SDKs for both Android and iOS. The functionality provided by the 3DS SDK is fully defined by EMVCo, and includes obtaining the required device information, performing the challenge process with the ACS as necessary, and providing all required security functionality. More specific details on using the 3DS SDK in a mobile application can be found in the "Getting Started with the 3DS SDK" guide.
The design of the app-based authentication is to gather data on the mobile device, and transmit it to a merchant controlled server where an authentication request is made. In the components, this data is prepared by the 3DS SDK and must then be transmitted via some channel to the Server component for submission to the Directory Server. The creation and usage of the communication channel between the app on the mobile device and the merchant's server is outside the scope of the components.
Preparing the Authentication Request
To begin, device specific information must be collected and prepared for transmission to the directory server. This is done automatically by the 3DS SDK when initializing the ThreeDS2Service using the initialize method. A full list of device parameters collected by the 3DS SDK can be found in the EMVCo 3-D Secure Specifications.
When getting ready to start authentication in the 3DS SDK, a Transaction object is created and the getAuthenticationRequestParameters method is used to encrypt the previously collected device information and prepare all other data necessary to be sent by the Server component in the SendAuthRequest method. This data is packaged and available in the returned AuthenticationRequestParameters object's AuthRequest property.
After obtaining this data, it must be transmitted by the app via a secure channel to the system where Server is used. The method used to transmit the value is outside the scope of the component.
See the documentation for the SendAuthRequest method for details on sending the authentication request after transmitting the data to Server.
Interaction With the Server Component
As mentioned above, the request to the Directory Server must be made by the Server component which resides on a server under control of the merchant. A web server is required even for app-based authentication both to send the authentication request and to be notified of authentication results later in the flow.
It is expected that a secure channel can be established between the app using the 3DS SDK and the server where the Server component resides in order to transfer information freely.
Sending the Authentication Request
SendAuthRequest begins the 3-D Secure transaction flow by sending an authentication request to the DirectoryServerURL.
After calling this method, check TransactionStatus to determine if the cardholder is authenticated (frictionless flow) or further cardholder interaction is required to complete the authentication (challenge flow).
Prior to calling SendAuthRequest, data must be collected to facilitate fraud checks by the ACS. The following properties are applicable for both app-based and browser-based flows:
- AcquirerBIN (required)
- AcquirerMerchantId (required)
- CardholderName (required)
- CardNumber (required)
- DirectoryServerURL (required)
- MerchantCategoryCode (required)
- MerchantCountryCode (required)
- MerchantName (required)
- PurchaseAmount (required)
- PurchaseDate (required)
- RequestorId (required)
- RequestorName (required)
- RequestorURL (required)
- ResultsURL (required)
- AccountType
- AuthenticationIndicator
- BillingAddress
- CardholderEmail
- CardholderHomePhone
- CardholderMobilePhone
- CardholderWorkPhone
- DecoupledMaxTimeout
- DecoupledRequestIndicator
- DeviceChannel
- MessageCategory
- PurchaseCurrency
- PurchaseExponent
- ServerOperatorId
- ServerTransactionId
- ShippingAddress
- ThreeRIIndicator
In the app-based flow, device specific information is prepared by the 3DS SDK on the customer's device. The Transaction object's getAuthenticationRequestParameters method returns an instance of AuthenticationRequestParameters. This object's AuthRequest property should be transmitted to the Server component. Set ClientAuthRequest to this data prepared by the 3DS SDK.
SendAuthRequest Example:
// ClientAuthRequest was received from the 3DS SDK via a secure channel
server.ClientAuthRequest = ClientAuthRequest;
// Assign mandatory known values
server.RequestorId = "az0123456789"; // assigned by DS
server.RequestorName = "Example Requestor name"; // assigned by DS
server.RequestorURL = "https://threedsrequestor.adomainname.net"; // URL of merchant site
server.AcquirerBIN = "868491"; // assigned by Acquirer
server.AcquirerMerchantId = "mGm6AJZ1YotkJJmOk0fx"; // assigned by Acquirer
server.MerchantName = "Example Merchant Name"; // assigned by Acquirer
server.MerchantCategoryCode = "5411"; // defined by DS
server.MerchantCountryCode = "840"; // defined in ISO 8583
// Cardholder Information
server.CardExpiryDate = "1910";
server.CardNumber = "8944988785642183";
server.CardholderName = "John Doe";
server.BillingAddress.City = "Bill City Name";
server.BillingAddress.Line1 = "123 Fake St.";
server.BillingAddress.State = "CA";
server.BillingAddress.PostalCode = "90210";
server.BillingAddress.Country = "840"; // ISO 3166-1
// ... See documentation for additional cardholder properties
// Purchase Information
server.PurchaseAmount = "1000"; // Decimal is implied, this is $10.00
server.PurchaseCurrency = "840"; // USD
server.PurchaseExponent = "2"; // 2 decimal places
server.PurchaseDate = "20170316141312"; // YYYYMMDDHHmmSS
// Required URLs
server.ResultsURL = "https://threedsserver.adomainname.net"; // URL on merchant site where results will be posted
server.DirectoryServerURL = "https://directoryserver";
server.SendAuthRequest();
Authentication Response Handling
After calling SendAuthRequest the TransactionStatus property holds the result. Possible values are:
| Transaction Status | Description |
|---|---|
| Y | Authenticated successfully |
| C | Cardholder challenge required |
| N | Not authenticated |
| A | Not authenticated, but a proof of authentication attempt was generated in AuthenticationValue |
| U | Not authenticated due to technical or other issue |
| R | Not authenticated because the issuer is rejecting authentication |
| D | Challenge required; decoupled authentication confirmed |
| I | Informational only; 3DS Requestor challenge preference acknowledged |
If the transaction is authenticated (Y or A), no further steps are required. The flow is considered frictionless and the 3-D Secure processing is complete. If processing a payment, the AuthenticationValue and AuthenticationECI values can be included as proof of 3-D Secure authentication.
If the transaction requires a cardholder challenge (C or D), further steps are required.
If the transaction is not authenticated, TransactionStatusReason may contain details about the reason.
The following properties are applicable after calling this method: - AuthenticationECI - AuthenticationValue - TransactionStatus - TransactionStatusReason - CardholderInformation - ACSURL (if challenge required) - ACSChallengeMandatedIndicator (if challenge required) - AuthenticationType (if challenge required) - DecoupledConfirmationIndicator
ClientAuthResponse is populated with data to be transmitted back to the 3DS SDK.
Note: The TransactionStatus is also populated in the Server component and may be inspected prior to transmitting ClientAuthResponse back to the 3DS SDK.
The 3DS Server is responsible for indicating to the 3DS SDK the results of the SendAuthRequest process, and whether or not a challenge is required. Exactly how this is done is outside the scope of the components themselves. The response to the 3DS SDK over the secure channel should include information on what to do next.
If a challenge is required (TransactionStatus is C), the ClientAuthResponse data is used by the 3DS SDK to populate an instance of the ChallengeParameters object, and is set via the ThreeDSServerAuthResponse property. This ChallengeParameters object is then used to initiate the challenge process within the mobile app via the Transaction object's doChallenge method. When doChallenge is called, control of the application UI is handed over to the 3DS SDK and the challenge is performed. The challenge process is performed by the SDK, and when finished a callback is fired to indicate the result (completed, cancelled, etc.)
If TransactionStatus is D, decoupled authentication takes place outside of the 3-D Secure flow and the results will be posted to the 3DS Server.
If TransactionStatus is Y or A, the transaction is complete.
Challenge Interaction
If the 3DS Server indicates to the 3DS SDK that a challenge is required, the challenge is performed by creating an instance of the ChallengeParameters object (using the ClientAuthResponse data that came from the 3DS Server), and calling the doChallenge method. The 3DS SDK will take care of all communication with the ACS while performing the challenge, as well as prompting the cardholder as needed for the required input. When the challenge process is complete, a callback will fire indicating the results of the challenge process (completed, cancelled, etc.)
The callback functions are set in the 3DS SDK using an instance of the ChallengeStatusReceiver object, which is passed, along with the ChallengeParameters to the doChallenge method.
Server Side Results Notification
When a challenge is completed for both app-based and browser-based flows a POST is made to the ResultsURL with a Results Request message.
Prior to checking this RReq message, the ServerTransactionId can be extracted using the ExtractRReqServerTransactionId configuration setting. This value can then be used to look up details on the transaction that were saved prior to starting the challenge process, including the messageVersion which must be set via the ProtocolVersion configuration setting prior to passing the RReq message to the CheckResponse method.
Pass the body of the HTTP request received at ResultsURL to the CheckResponse method. This contains information about the results, and asks for a Results Response to be sent back containing the ResultsStatus.
After calling this method the following properties are populated: - AuthenticationECI - TransactionStatus - TransactionStatusReason - ChallengeCancellationIndicator - AuthenticationType - AuthenticationValue
After passing the received RReq message to the CheckResponse method, all the properties required to be set before building the RRes will have been populated except for ResultsStatus, which indicates whether or not the message was successfully received for further processing, or provides more detail to the ACS on why the challenge could not be completed.
Possible values for ResultsStatus include:
| 01 | Results Request Received for further Processing. |
| 02 | Challenge Request not sent to ACS by 3DS Requestor (3DS Server or 3DS Requestor opted out of the challenge. |
| 03 | ARes challenge data not delivered to the 3DS Requestor due to technical error. |
The Server can use the value of the RequestorChallengeInd to determine whether or not a value of 02 is appropriate. It must use the necessary error handling logic when processing ARes messages to determine whether or not a value of 03 is appropriate.
Once ResultsStatus has been set, GetResultsResponse can be called and will return a string containing the reply to be sent in the response. In your HTTP server use the string returned from this method as the body of the reply, and set the Content-Type header to application/JSON charset=utf-8.
Additional Functionality
The components provide a number of methods and settings designed to make the process of integrating support for EMV® 3-D Secure as easy as possible. Below are some of the additional features offered by the components.
Resetting Transaction Info
ResetTransactionInfo must be called between transactions when using the same component instance.
Each transaction that is attempted uses transaction specific values that should not be re-used in subsequent transactions. Call this method to make sure that any transaction specific information is cleared between transactions.
This method resets only the transaction specific information without resetting any other values which have been configured. This allows re-use of the same component instance.
See the documentation for a complete list of values that are reset.
Logging with Server and 3DS SDK
Logging is available in both the Server component and 3DS SDK. The Server component has events that will fire for various occurrences. In the 3DS SDK, logging is configured by passing a ClientEventListener instance when initializing the ThreeDS2Service.
Anytime a message is built or a response is parsed (including Error Messages), the Log event is fired and the message is available in the Message event argument. Properties such as EphemeralKey and DeviceParams are also available when they are gathered by the 3DS SDK. The other event arguments are LogLevel and LogType.
LogLevel indicates the level of the message. Possible values are 0 (None), 1 (Info - default), 2 (Verbose), and 3 (Debug).
LogType identifies the type of log entry. Possible values include types corresponding to the message or property being logged, such as "AReq", "ARes", "CReq", "CRes", "RReq", "RRes", "PReq", "PRes", "Erro", "EphemeralKey" and "DeviceParams".
The following code example demonstrates how information about messages and properties may be gathered using the Log event:
void server_OnLog(Object sender, ServerLogEventArgs e)
{
	String message;
	if(e.LogType=="AReq")
	{
		// logged when AReq built by server.SendAuthRequest()
		message = e.Message;
	} else if(e.LogType=="ARes")
	{
		// logged when ARes received and parsed after calling server.SendAuthRequest();
		message = e.Message;
	}
}
The Server and 3DS SDK also have DataPacketIn and DataPacketOut events that fire anytime a data packet is received or sent, respectively. The entire data packet is then accessible in the event argument DataPacket. This parameter may be inspected for advanced troubleshooting, or to extract additional response properties beyond the scope of this component. For example:
void server_OnDataPacketIn(Object sender, ServerDataPacketInEventArgs e)
{
	String dataPacket = e.DataPacket;
	// note: the event fires before the component parses the data, so accessing Server properties populated during parsing is not available
}
void server_OnDataPacketOut(Object sender, ServerDataPacketOutEventArgs e)
{
	String dataPacket = e.DataPacket;
}
We appreciate your feedback. If you have any questions, comments, or suggestions about this article please contact our support team at support@nsoftware.com.