
Authenticating to Microsoft (Office) 365 with OAuth as an Unattended Application
Requirements: IPWorks, Cloud Keys, Cloud Mail, or Cloud Storage
The Microsoft Identity Platform supports authentication with OAuth either as a signed-in user (i.e., "delegated" mode) or as an unattended service application (i.e., "app-only" mode). This guide will cover the Client Credential grant flow for OAuth, which is used to authenticate applications to the Microsoft Graph API and Office 365 Exchange service when a signed-in user is not present.
Contents
Overview and Background Information
According to Microsoft's recommendation, the client credential grant flow should be used exclusively for applications that are difficult to access, such as web apps, web API apps, and daemon/service apps. The reason behind this recommendation is that the client credential grant flow mandates the utilization of application-level permissions, or scopes, which in turn necessitate the configuration of a client secret or client certificate to enable access. Furthermore, when configuring the application for the first time and integrating with Office 365 Exchange services like IMAP, POP3, and SMTP, Microsoft imposes additional steps.
The client credential flow, similar to other OAuth flows, consists of two phases.
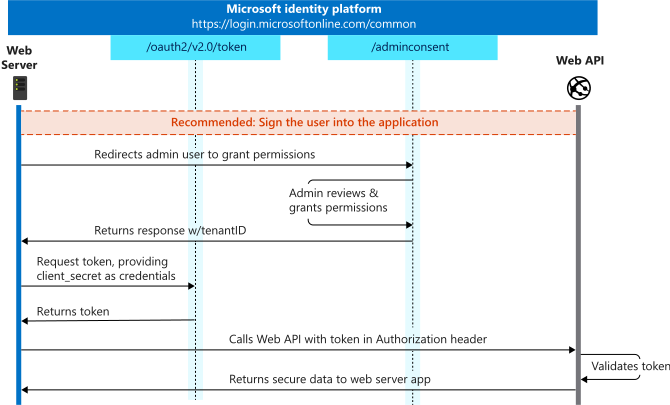
In the first phase, the application must obtain consent for the specified scopes in order to access protected resources, such as accessing a mailbox to send emails. However, in the client credential grant flow, this consent is obtained from the administrator of the tenant rather than the user of the protected resource. This initial step occurs during the application setup process in the working environment. Further details regarding the process of obtaining consent from the administrator will be provided later.
The second phase involves authentication with the token server, which does not require any user interaction. This is one of the main advantages of the client credentials grant flow. To authenticate successfully, the user needs to provide additional credentials, such as a client secret or certificate, along with the client ID. Detailed information on acquiring the required credentials and making the authentication request will be provided later in the discussion.
Application Registration
To begin configuring an application for the client credential grant flow, the first step is to register it with Azure. For detailed instructions on setting up and registering an application, you can refer to our comprehensive guide on application setup and registration found here.
Multitenant vs. Single Tenant
In the client credential grant flow, it is a Microsoft requirement that the application be either single tenant or multitenant. This means that personal accounts cannot be used due to the absence of admin consent. When deciding which account types to allow, it is crucial to consider who will have access to the application. When the administrator grants consent to the scopes, it applies to the entire tenant. Therefore, if multiple tenants are consented, the application can utilize the same credentials to access the combined protected resources of those tenants. More information on the account types can be found here.
Platforms and Redirect URIs
The client credential grant type does not require any specific platform configurations to be added. Therefore, there is no need to include any additional platform configurations for this grant type. However, if you intend to generate an admin consent URL using the OAuth component, which will be discussed later, you will need to add a redirect URL to the Web platform type. This redirect URL is typically in the format of "http://localhost:PORT". It's important to note that currently, Microsoft does not perform port matching, meaning the port specified in the redirect URL does not need to match the port specified in the request's redirect_uri parameter. More information on the platforms and redirects can be found here.
Application Scopes
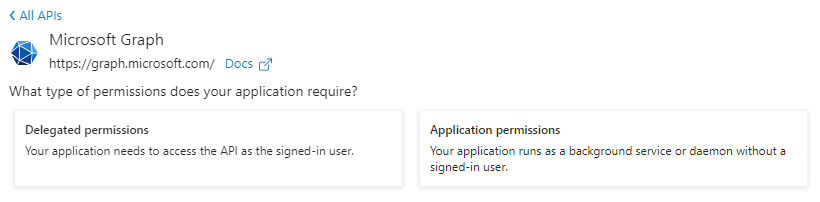
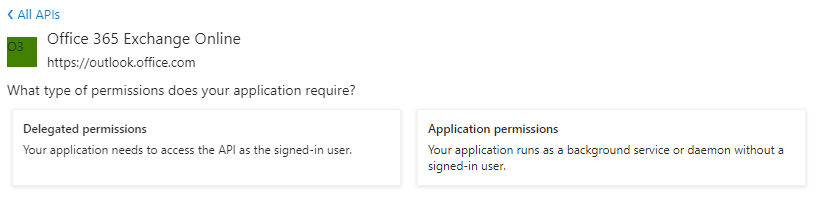
When adding scopes for your application, it is important to select "Application permissions" scopes instead of "Delegated permissions" scopes. Application permissions provide broader access to resources and are suitable for scenarios where the application itself needs to access and act on behalf of the user or the organization. Microsoft recommends requesting only the permissions that are necessary for the specific functionality of your application. By minimizing the requested permissions, you reduce the potential impact in case the application or its credentials are compromised. More information on the permissions can be found here.
When configuring permissions for your application in Azure, the specific permission and API to be set depend on the service you are using. Let's consider two scenarios:
- If your project is using the Office365 component from the CloudMail product and requires access to modern functionalities provided by Microsoft Graph, you would need to set the application permissions under the "Microsoft Graph" API. This API enables integration with various Office 365 services and offers a wide range of permissions to choose from.
- On the other hand, if your project involves using a legacy mail protocol such as IMAP, POP3, or SMTP, the application permissions would be found under the "Office 365 Exchange Online" API. This API specifically focuses on providing access to Exchange Online services, including email-related functionalities through legacy protocols.
It's essential to identify the correct API and set the appropriate application permissions based on the service you are utilizing in your project. This ensures that your application has the necessary access and authorization to interact with the desired functionalities and resources.
Credentials
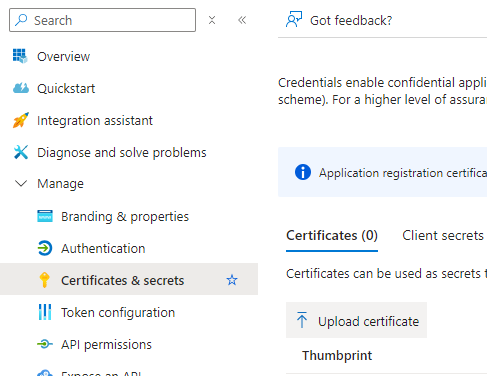
When using the client credential grant flow, Microsoft mandates the provision of credentials for the application. The OAuth component supports two types of credentials: client secrets and certificates. Client secrets are a straightforward option for providing credentials. They involve a client secret key that is securely stored and shared between the application and the Microsoft Identity Platform.
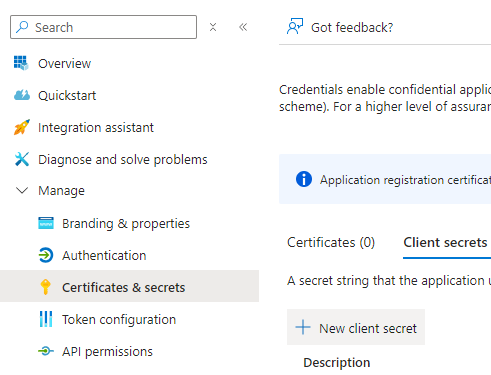
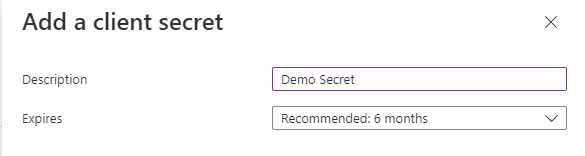
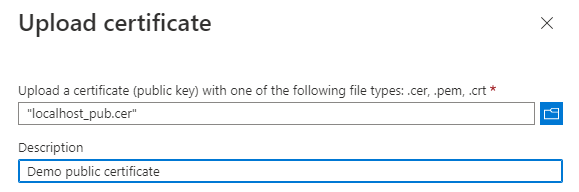
While client secrets are easier to set up and maintain, they may be considered less secure compared to certificates. Certificates, on the other hand, offer a higher level of security but require more intricate setup and maintenance. Certificates involve the use of a public-private key pair, where the public key is registered with Azure AD and the private key is securely stored by the application. The use of certificates adds an extra layer of protection to the authentication process.
It is important to carefully consider your security requirements and implementation capabilities when choosing between client secrets and certificates as the credential type for your application. More information on the credential types can be found here.
Administration
All permissions will require that an Azure administrator grant consent for the scopes presented by the application. There are two ways for an admin to provide consent. If the admin is in the same tenant as the application registration, they can consent directly from the Azure Portal. Otherwise, an admin consent URL will need to be generated, which can be done using the OAuth component.
Azure Portal
If the administrator is in the same tenant as the application registration, they can grant consent directly from the Azure Portal. This can be done by navigating to the "API permissions" tab in the "Application registration" node, and then clicking the "Grant admin consent for Directory" button. After granting consent, the status of the permissions should change accordingly.

Admin Consent Flow
If the administrator is in a different tenant, you can generate an admin consent URL using the OAuth component. This URL allows the admin to go through the authorization steps and provide consent for the requested scopes. The OAuth component supports this process using the ogtAdminConsent grant type. A redirect URI needs to be set up, typically using a valid localhost URI. The component requires only the client ID to be set.
There are two ways to handle the admin consent flow:
-
Direct: If the administrator is on the same machine as the OAuth component, the GetAuthorization method can be called with the ocpApplication profile. The component will handle launching a browser window and an internal web server so that the administrator can provide consent and the OAuth component can parse the response. In the response, it will contain the tenant ID on a success or an error code and description if there is a failure.
-
Indirect: If the administrator is not able to access the machine, then the GetAuthorizationURL method can be used to generate just the admin consent URL. Providing this URL to the administrator will allow them to provide consent for the application on whatever machine they do have access to. While the redirected response will not be captured, it does not contain critical information.
Example: Direct
Oauth oauth = new Oauth();
oauth.ClientProfile = OauthClientProfiles.ocpApplication;
oauth.GrantType = OauthGrantTypes.ogtAdminConsent;
oauth.ClientId = "CLIENT_ID";
oauth.WebServerPort = 7777;
oauth.ReturnURL = "http://localhost:7777";
oauth.GetAuthorization();
string error = oauth.Config("Microsoft365AdminConsentError");
string errorDesc = oauth.Config("Microsoft365AdminConsentErrorDesc");
string tenantID = oauth.Config("Microsoft365AdminConsentTenant");
Example: Indirect
Oauth oauth = new Oauth();
oauth.ClientProfile = OauthClientProfiles.ocpApplication;
oauth.GrantType = OauthGrantTypes.ogtAdminConsent;
oauth.ClientId = "CLIENT_ID";
oauth.WebServerPort = 7777;
oauth.ReturnURL = "http://localhost:7777";
string authURL = oauth.GetAuthorizationURL();
Office 365 Exchange
For applications using legacy mail protocols (IMAP, POP3, or SMTP), additional steps are required to link the mailboxes to the application. Once the admin has granted consent to the application's API permissions, the application will be added to the "Enterprise applications" node in the tenant. However, Office 365 Exchange also requires the application to be added there.
An Azure Portal administrator needs to perform the following steps:
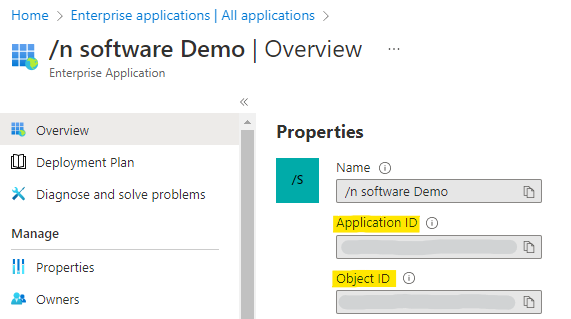
- Navigate to the "Enterprise applications" node in the tenant of the user mailboxes the application needs access to.
- Select the application and note down the Application ID and Object ID from this node (not from the "App registrations" node).
Next, the Exchange administrator should use PowerShell cmdlets to connect to Exchange Online, create a new service principal, and add mailbox permissions for the user to the newly created service principal. The Add-MailboxPermission cmdlet needs to be executed for each mailbox, including shared mailboxes.
Here's an example PowerShell script:
Install - Module - Name ExchangeOnlineManagement - allowprerelease
Import - module ExchangeOnlineManagement
Connect-ExchangeOnline -Organization TENANT_ID
New-ServicePrincipal -AppId APPLICATION_ID -ServiceId OBJECT_ID
Add-MailboxPermission -Identity EMAIL -User OBJECT_ID -AccessRights FullAccess
After completing these steps, Office 365 Exchange should be aware of the application, allowing the use of the client credential grant flow.
Component Setup
Below are two examples of using the client credential grant type depending on the API and component you are using. The first example is using the internal OAuth support that the components in CloudKeys, CloudMail, and CloudStorage provide innately. The second example is using the OAuth component directly to get the access token, which is then supplied to the IMAP component to use for authentication.
Example: Microsoft Graph
Office365 office365 = new Office365();


office365.OAuth.ClientProfile = OAuthClientProfiles.cocpApplication;
office365.OAuth.GrantType = OAuthGrantTypes.cogtClientCredentials;
office365.OAuth.ClientId = CLIENT_ID;
office365.OAuth.ClientSecret = CLIENT_SECRET;
office365.OAuth.ServerTokenURL = "https://login.microsoftonline.com/TENANT_ID/oauth2/v2.0/token";
office365.OAuth.AuthorizationScope = "https://graph.microsoft.com/.default";


office365.Authorize();


office365.Config("UserID=example@email.com");
office365.MessageSubject = "I saw a Tree";
office365.MessageBodyContentType = "TEXT";
office365.MessageBodyContent = "It was in my back yard initially. It was still there when I last checked.";
office365.MessageTo = "TreeLookOut@gmail.com";


office365.SendMail(True);
Example: Legacy Mail API
Oauth oauth = new Oauth();
oauth.ClientProfile = OauthClientProfiles.ocpApplication;
oauth.GrantType = OauthGrantTypes.ogtClientCredentials;
oauth.ClientId = "CLIENT_ID";
oauth.ClientSecret = "CLIENT_SECRET";
oauth.ServerTokenURL = "https://login.microsoftonline.com/TENANT_ID/oauth2/v2.0/token";
oauth.AuthorizationScope = "https://outlook.office365.com/.default"; // Note this is a different scope than example 1.
string authorization = oauth.GetAuthorization();


Imap imap = new Imap();


imap.AuthMechanism = ImapAuthMechanisms.amXOAUTH2;
imap.Config("AuthorizationIdentity=" + authorization);
imap.MailServer = "outlook.office365.com";
imap.User = "EMAIL";
imap.SSLStartMode = ImapSSLStartModes.sslImplicit;
imap.MailPort = 993;
imap.Connect();
Summary
When evaluating the client credential grant type, it is crucial to carefully assess the security and accessibility aspects of your application. Although this grant type minimizes user interaction within the application, it places an increased responsibility on cloud environment administrators. Microsoft advises considering alternative grant types whenever feasible, as they offer additional safeguards in the event of application compromise through delegated permissions. For further insights into the distinctions between delegated and application permissions, please refer to the detailed information provided here.
We appreciate your feedback. If you have any questions, comments, or suggestions about this article please contact our support team at support@nsoftware.com.