
Setting up the Azure Portal for OAuth
Requirements: IPWorks or Cloud Mail
The Azure Portal can be used in conjunction with the OAuth component to authenticate with a variety of different grant types and flows.
Contents
Overview
Before the OAuth component can be used to authenticate with the Azure Directory Identity Service, the Azure Portal will need to be used to create and configure an application registration. It is important to understand which grant type(s) will need to be supported by the application before creating the application registration.
| Authorization Code | Retrieves an authorization code that is exchanged for an access token |
| Client Credentials | Authenticates as an application which has been granted admin consent |
| Device | Present a device code that a user can provide to the authorization server from a different device |
| Implicit | Authorization server provides identity and access tokens instead of the token server |
| Password Resource Owner | Deprecated flow that uses the application owner's username and password |
App Registration Page
To start, enter the "Application Registration" node on the Azure Portal. On the landing page, select "New Registration" to bring you to the "Register an application" page.

Here you can select the user-facing display name, decide what accounts can use the application, and add a Redirect URI platform.
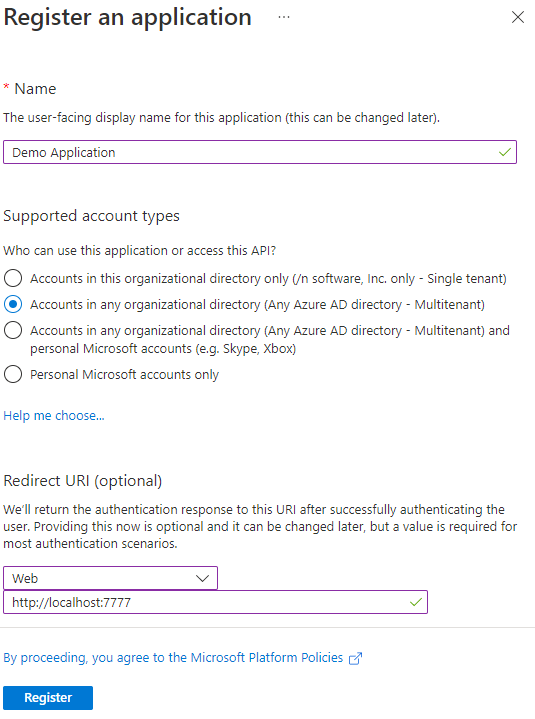
Supported Account Types
Depending on your application, you may want to limit who can access the application.
Single Tenant
Single tenant applications reduce the accounts that can use the application down to just those within the same tenant as the registration. When using a single tenant application, the endpoints must contain the tenant ID rather than the "common" keyword. This application type is generally recommended when the application will be used as an internal tool rather than shared.
Multitenant
Multitenant applications allow for accounts from any organization to authenticate with and access this application. This allows the use of the "common" keyword in the authorization and token server endpoints. This application type is necessary for applications that will be used with many different accounts from other organizations.
Personal Accounts
Personal accounts are accounts that do not have an organization associated with them. These accounts are used to interact with consumer services such as Microsoft 365 Personal, Skype, Xbox Live, and more. Applications can be configured to be multitenant and support personal accounts or only support personal accounts, depending on the option that is selected.
When deciding what account type to use, it is important to understand who will be using the application and which grant types will be used. Single tenant applications are easier to manage from an Azure Administrator's standpoint as the number of accounts that can access the application is reduced. Additionally, it simplifies the administrator consent steps when setting up an application to use the client credentials grant type. Multitenant applications are easier to share with other organizations or clients and can be configured to allow personal accounts which is sometimes required for certain consumer services.
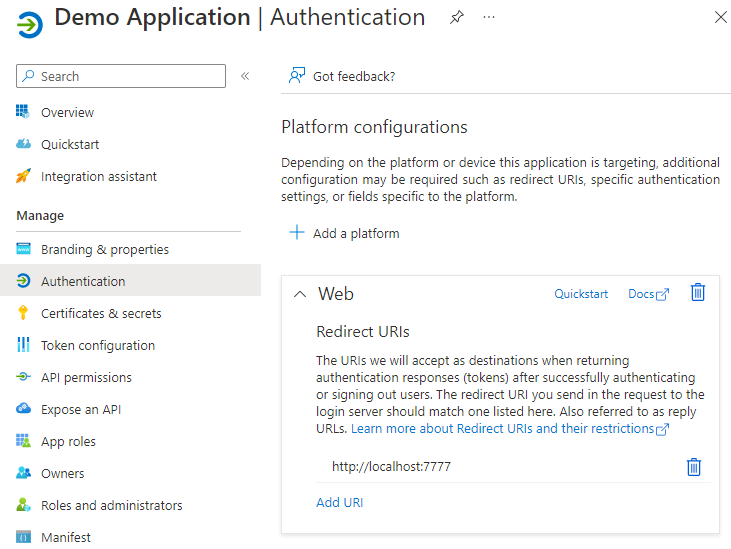
Platforms and Redirect URIs
For certain grant types, the application will need to specify a redirect URI as well as the platform that the application is targeting. The redirect URI represents where the user is redirected to after they authenticate with the Microsoft authorization server. The redirect URI will be provided through the redirect_uri parameter in the authorization server URI that the user is directed to. The authorization code and implicit grant types require the application to parse specific information from the redirect URI's query parameter. Additionally, the Microsoft admin consent flow supplies additional information via the redirect URI's query parameter. For these grant types, it is highly recommended to use the web platform configuration, which specifies the web server that will parse the authorization code or access token from the query parameter. For example, the following URL contains the authorization code LONG_STRING in the code parameter.
http://localhost:60845/?code=LONG_STRING&session_state=UUID#
When using the OAuth component's application client profile, the component will start an internal web server in order to handle the parsing of the URI. To use the internal web server, the application will need to have the localhost URI.
| http://localhost:port | Internal web server URI when SSL/TLS is turned off |
| https://localhost:port | Internal web server URI when SSL/TLS is turned on |
At this time, the port that is provided in the redirect_uri parameter does not need to match the port that is set in the application registration.
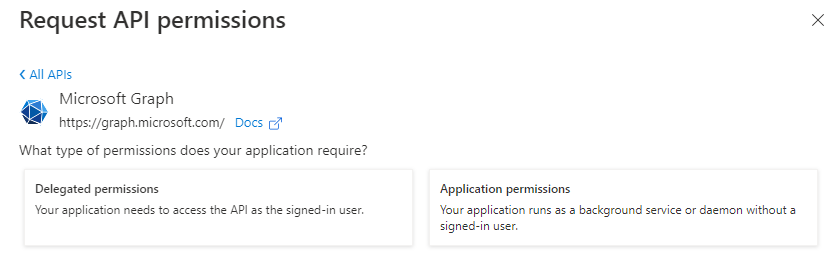
Application vs. Delegated Permissions
After the application has been registered, you can then optionally choose to specify the permissions of the application. Permissions are often referred to as "scopes" or "authorization scopes". In Azure, the two types of permissions are application and delegated permissions. Application permissions are for situations where the application is authenticated as itself rather than a user. Due to the lack of user consent, these permissions will often require administrator consent and are therefore typically used with the client credentials grant flow. Delegated permissions are used when the application is authenticating as a user. Typically, these permissions can be granted by the user account themselves rather than by the administrator of the tenant; thus, these permissions are typically used with all other grant flows (i.e. authorization code, implicit, device, and password resource owner).
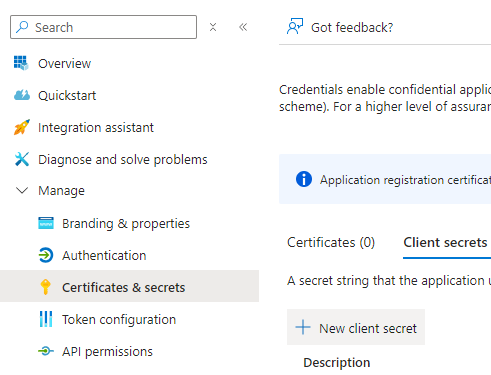
Credentials
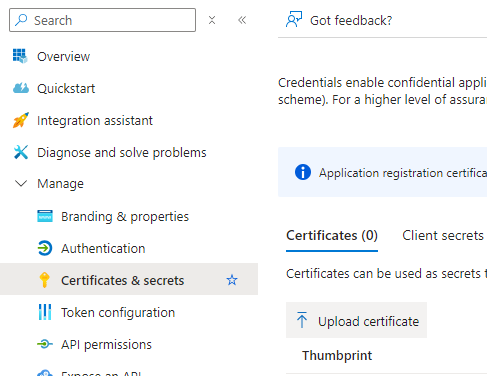
Microsoft allows for three types of credentials to be used for authentication purposes: secrets, certificates, and federated credentials. To manage these credentials, navigate to the "Certificates & Secrets" node of the application registration. At this time, our products do not support the use of federated credentials.
Secrets
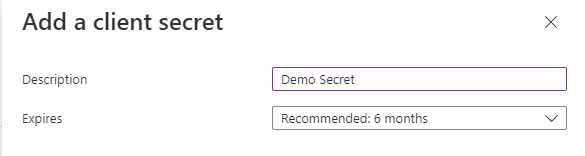
Client secrets are secret strings that the application uses to prove its identity when requesting a token. While they are easy to use, they are not as secure as using a certificate. To create a new client secret, select the "+ New client secret" option.
Decide on a description and the validity time of the secret and complete the process by clicking on "Add". The maximum validity time is currently 24 months. After the secret is created, immediately make note of the Value (not the Secret ID) as it will not be available to view again. If the client secret value is lost, a new secret must be created.
Certificates
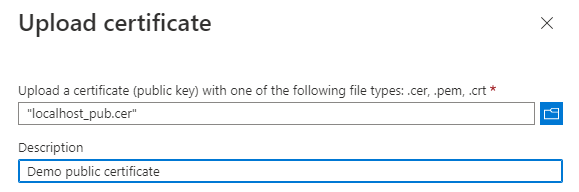
Certificates can be used as secrets to provide the application's identity as well. Microsoft recommends using a certificate over a client secret due to the higher level of assurance. To start, you will need to have access to the public key which will be uploaded to Azure. Additionally, the private key will need to be accessible by the application so that it can sign the JWT assertion that is sent to the token server. Click on the "Upload certificate" button and select the file where the public key is stored.
Add a description to help identify the certificate later and then click "Add".
Summary
Before creating the application registration, it is important to understand the scope of your application and the Azure environments your application will be working in. For more information, please see the service documentation from Microsoft.
We appreciate your feedback. If you have any questions, comments, or suggestions about this article please contact our support team at support@nsoftware.com.