
Signing PDFs with PKI Agent
Requirements: Secure PDF and PKI Agent
Introduction
PKI Agent enables signing of PDF documents in the browser by leveraging the remote signing capabilities of the PDFSign component. Since web applications cannot directly access cryptographic keys stored outside the browser, the signing operation must occur externally, making remote PDF signing a practical use case for PKI Agent.
When at least one signing certificate is configured in PKI Agent and it is running on the local system, web applications can initiate signing requests to the PKI Agent REST API to create signatures. For PDF signatures in particular, PDFSign takes care of preparing the necessary data so it can be passed to PKI Agent for signing.
Setting up PKI Agent
Once PKI Agent is installed, locate its icon in the system tray and open the certificate sharing window by double-clicking the icon or right-clicking it and choosing Certificates....
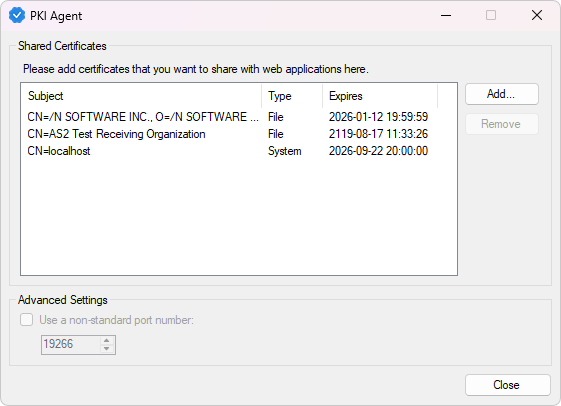
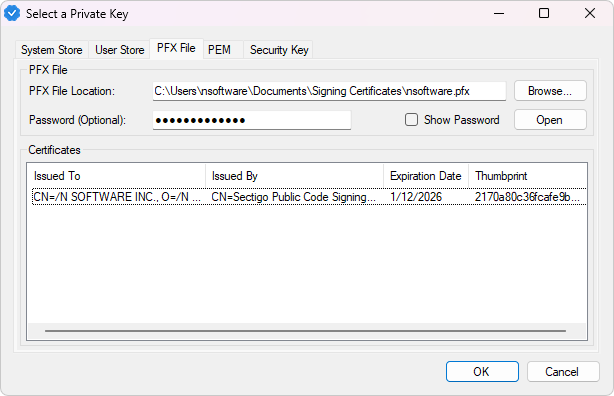
Click the Add... button to add your signing certificate. A new dialog window will open where you can choose the type of certificate you want to load and then enter its details. It can be from a PFX or PEM file, Windows certificate store, or HSM.
Once you have added all the certificates you want to use with PKI Agent, close the window, right-click the PKI Agent icon in the system tray, and choose Start to start the server.
Authorizing with PKI Agent
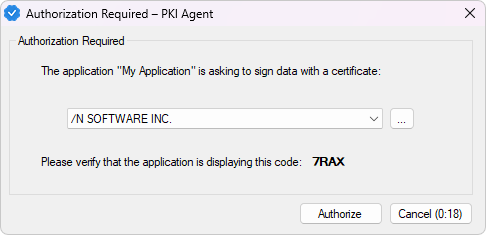
The first step is to use the PKI Agent REST API to authorize via the /authorize endpoint. When the authorization request is sent, PKI Agent will display a prompt so that the user can verify the PIN and application name, choose the certificate to use for the signature, and grant permission for signing:
The following code uses the HTTP component from IPWorks to send an authorization request:
// Prepare the PIN
byte[] pinData = new byte[2];
Random rnd = new Random();
rnd.NextBytes(pinData);
string pin = Convert.ToHexString(pinData);


// Display the PIN and application name to the user here


// Send the authorization request
HTTP http = new HTTP();
int statusCode = 0;
http.OnStatus += (s, e) =>
{
  statusCode = e.StatusCode;
};
http.Get("http://127.0.0.1:9267/authorize?pin=" + pin + "&origin=My%20Application");
if (statusCode != 200)
{
  throw new Exception("Signing request rejected. Failed to obtain authorization.");
}
The response will be in JSON format and contain an authorization token to be used in the signing request, as well as information about the selected certificate. The following code uses the JSON component from IPWorks to parse both the authorization token and the certificate from the response:
// Parse the token and certificate from the response
JSON json = new JSON();
json.BuildDOM = true;
json.InputData = http.TransferredData;
json.Config("StringProcessingOptions=1"); // 1 - unquote
json.Parse();
json.XPath = "$.cred";
string cred = json.XText;
json.XPath = "$.objects[1].value";
string cert = json.XText;
Preparing the Document
The next step is to use PDFSign to prepare a "pre-signed" document and obtain the raw data to be signed by PKI Agent. This incomplete document will contain a signature window where the signature will eventually be inserted while also preserving any configured signature and widget settings, eliminating the need to reconstruct the same document later during the completion stage.
Set the RemoteSignatureMethod configuration setting to either pkcs1 or pkcs7 to instruct the component to use remote signing, call the Sign method, and retrieve the hex-encoded data from the RemoteSignatureDigest configuration setting. For example (PKCS#1):
pdfsign.InputFile = "input.pdf";
pdfsign.OutputFile = "presigned.pdf";
pdfsign.SigningCert = new Certificate(CertStoreTypes.cstPublicKeyBlob, Convert.FromHexString(cert), "", "*");
// Configure signature and/or widget properties as desired
pdfsign.Config("RemoteSignatureMethod=pkcs1");
pdfsign.Sign();
string toBeSigned = pdfsign.Config("RemoteSignatureDigest");
Note that with PKCS#1, it is PDFSign, not PKI Agent, that builds the PKCS#7 signed-attributes field that is the value of RemoteSignatureDigest. Since the public copy of the signing certificate is included in this data, you must provide it in the SigningCert property on this stage. This is optional in the PKCS#7 method, however.
Signing with PKI Agent
Then, format the signing request and use the PKI Agent REST API's /sign endpoint to send it. The request will differ slightly depending on the remote signing method being used (PKCS#1 or PKCS#7), but with either method, including the token from the authorization response via the token query parameter prevents the user from having to grant permission through the prompt window again.
PKCS#1
In the request body, place the data to be signed (the hex-encoded PKCS#7 signed-attributes field) in the plaintext field, and use the alg field to specify that PKI Agent should additionally hash the data before signing:
// Build the request JSON
http.ContentType = "application/json";
http.PostData = "{\"plaintext\":\"" + toBeSigned + "\", \"alg\" : { \"name\": \"sha256WithRSAEncryption\", \"props\": [] }}";


// Send the request
http.Post("http://127.0.0.1:9267/sign?token=" + cred);
if (statusCode != 200)
{
  throw new Exception("Signing authorization expired or request failed.");
}
The response will contain a hex-encoded DER signature in PKCS#1 format along with information about the certificate used to create the signature. The following code uses the same JSON instance as above to extract the signature:
// Parse the signature from the response
json.Reset();
json.BuildDOM = true;
json.InputData = http.TransferredData;
json.Config("StringProcessingOptions=1"); // 1 - unquote
json.Parse();
json.XPath = "$.signature";
string signedData = json.XText;
PKCS#7
Place the data to be signed (the document hash) in the request body, and use the alg and profile query parameters to specify that PKI Agent should incorporate the data directly into the PKCS#7 structure it builds and apply a pre-configured set of parameters tailored for PDF signing. The response will contain a PKCS#7 signature in its entirety:
// Prepare the request
http.ContentType = "application/octet-stream";
http.PostDataB = Convert.FromHexString(toBeSigned);


// Send the request
http.Post("http://127.0.0.1:9267/sign?token=" + cred + "&alg=pkcs7&profile=pdf");
if (statusCode != 200)
{
  throw new Exception("Signing authorization expired or request failed.");
}


// Obtain and hex encode the signature
string signedData = Convert.ToHexString(http.TransferredDataB);
Completing the Signature
Finally, set the RemoteSignatureData configuration setting and call Sign again to insert the signed data into the signature window, passing the pre-signed document from earlier as the input:
pdfsign.Reset();
pdfsign.InputFile = "presigned.pdf";
pdfsign.OutputFile = "signed.pdf";
pdfsign.Config("RemoteSignatureData=" + signedData);
pdfsign.Sign();
We appreciate your feedback. If you have any questions, comments, or suggestions about this article please contact our support team at support@nsoftware.com.