
Getting Started with PKI Proxy
Requirements: PKI Proxy
Contents
Introduction
PKI Proxy is a secure key server which enables remote code and document signing using centrally stored keys. Hardware security modules (HSMs), file-based certificates (PFX files), ECDSA keys, and USB hardware tokens such as Yubikey or DigiCert tokens are all supported. The private key never leaves your server, and PKI Proxy employs SSL/TLS to secure all communications.
PKI Proxy works by configuring a private key in the PKI Proxy application and defining user access. From the client machine where the signing will take place requests can be made to PKI Proxy using the included PKCS#11 driver, by configuring the Windows Key Storage Provider (KSP), by utilizing the included command line tools, or by making requests directly via the Web API.
Server Configuration
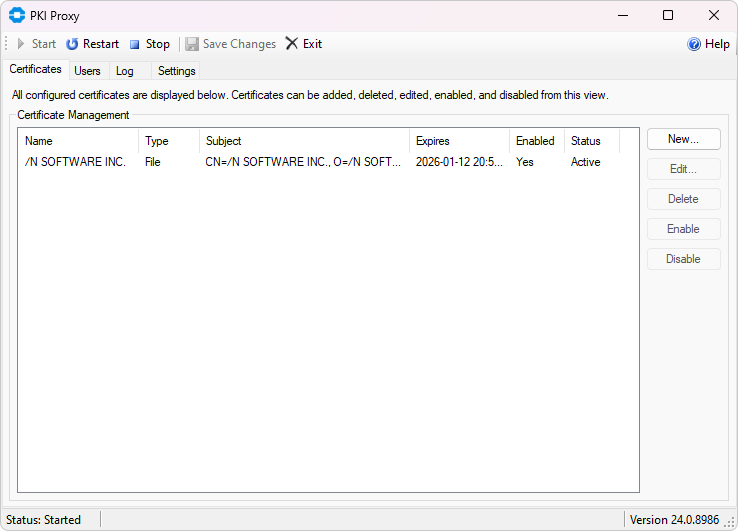
The PKI Proxy application controls which keys are shared, and which users have access to the shared keys. Run the PKI Proxy application by following the links in the start menu, or by running PKIProxy.exe from the installation directory.
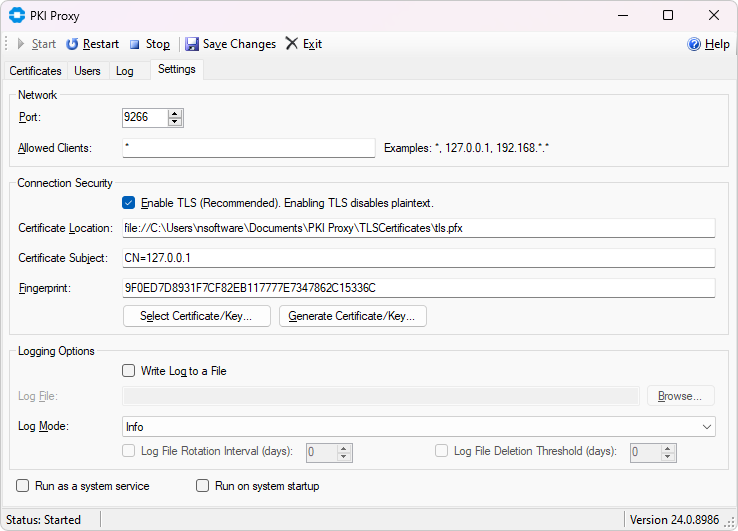
The Settings tab contains settings for the server itself. You can enable or disable TLS, generate or select a TLS certificate, and choose which port the server will use.
Adding Users
The list of users that may access PKI Proxy can be managed on the Users tab. Click New... to create a new user. Users must authenticate to PKI Proxy in order to perform any operations with the shared certificates. Users are created within the PKI Proxy application and can be assigned any of the following authentication methods:
| Secret Key | A pre-shared secret key is used along with the specified user. Each request and response is individually authenticated using a signature scheme. |
| HTTP Basic | Standard HTTP Basic authentication is performed using the defined user and password. |
| HTTP NTLM | HTTP NTLM authentication is performed. When adding a user in the PKI Proxy application choose the current Windows user, or select another existing user. |
When a certificate is shared, only the users which have been allowed access to that specific certificate may perform operations with it. User access can be granted or modified from the PKI Proxy application on the Certificates tab.

Sharing a Certificate
PKI Proxy allows selecting PFX files, certificates installed to the Windows certificate store, and certificates stored on hardware tokens (PKCS#11).
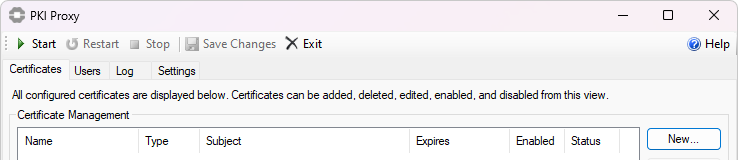
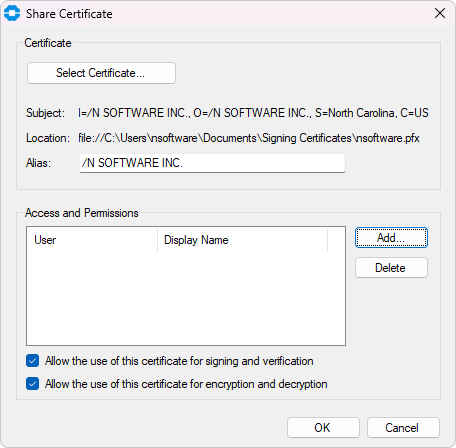
To select the certificate to share, navigate to the Certificates tab and click the New... button. Within this dialog the Select Certificate button will open a new dialog to pick the desired certificate.
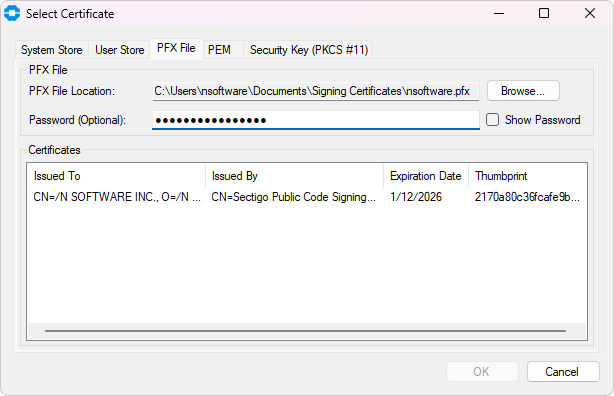
PFX Files
For PFX files, simply select the PFX File tab and browse to the PFX location on disk, enter the password and choose the appropriate certificate from the list.
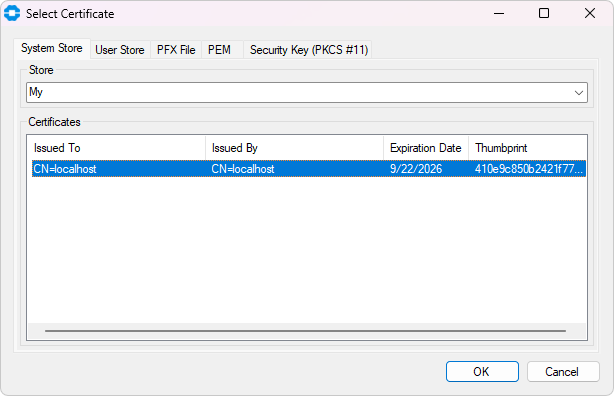
Windows Certificate Store
PKI Proxy supports selecting certificates installed to either the system certificate store or the current user's certificate store. To do that, go to either the System Store or User Store tab and select the desired certificate from the list.
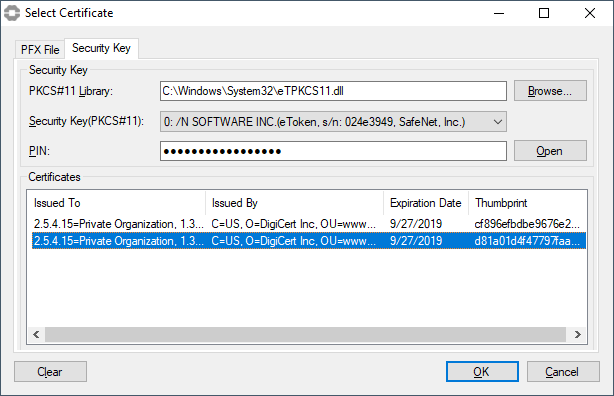
Hardware Tokens / PKCS#11
For hardware tokens, on the Security Key tab first browse to the PKCS#11 driver provided by your hardware token manufacturer. This driver may be installed with tools provided by your hardware token manufacturer or may be provided as a separate download. For instance the "SafeNet Authentication Client" software used by many certificate authorities will install a PKCS#11 library at C:\Windows\System32\eTPKCS11.dll. Yubikeys are supported via the libykcs11.dll which is included with the Yubico PIV Tool.
Configure Access
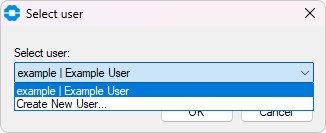
After selecting a certificate, click the Add button in the Allowed Users section to add an existing user, or create a new user.
If you have already create the user you want to share the certificate with, you can select them from the list. If you want to add a new user now, select the Create New User ... option.
Finally, press OK and use the Start button to start the server and begin sharing the certificate.
Startup Settings
PKI Proxy has 2 startup settings that can be combined to suit your needs. You can find the controls at the bottom of the Settings tab.
Enabling "Run as a system service" will cause the sharing server to run as a service instead of running in user mode. By default, PKI Proxy registers the service to run under the Local System account. However, if you want to share certificates from a user's Personal system certificate store, you will need to change the service to run under that user's account (from the Windows Services app). A service that runs under the local system or a different account won't be able to see them.
Enabling "Run at system startup" will cause the sharing server and administration console to start automatically when you sign into the system. If "Run as a system service" is also enabled, the service will be set to Automatic.
Client Configuration
PKI Proxy works by configuring a private key in the PKI Proxy application and defining user access. From the client machine where the signing will take place requests can be made to PKI Proxy using the included PKCS#11 driver, by configuring the Windows Key Storage Provider (KSP), by utilizing the included command line tools, or by making requests directly via the Web API. The following sections provide details about configuring the KSP and PKCS#11 connections.
Key Storage Provider (KSP)
The PKI Proxy KSP module is a Windows plugin that enables Windows to work with certificates shared by a remote PKI Proxy application as if they reside locally. The module integrates PKI Proxy certificates to the Windows certificate store, allowing third-party applications use them in a standardized way. Any application that knows how to work with Windows certificate API can use PKI Proxy certificates transparently.
The KSP module is installed during the setup process. After installation the PKIProxyKSP.dll library should be present in both C:\Windows\System32 and C:\Windows\SysWOW64.
Certificates shared by PKI Proxy are not exposed automatically by the KSP. Use the PKIProxyCertMgr.exe application present in the installation directory of PKI Proxy to add, remove, or view remote certificates currently mapped to the Windows certificate store.

Adding a Certificate
Click the Add button to add a PKI Proxy certificate to the Windows certificate store. The Add Certificate dialog provides options to configure the URL of the PKI Proxy application, as well as user credentials.

The following configuration options are available in this dialog.
| Server Location | The Location field specifies the URL of the server. If TLS is configured in the PKI Proxy Server this should begin with "https://" and contain the hostname or IP address of the server, along with the port on which the server is configured to run. For instance https://localhost:9266. |
| User Credentials | The user credentials are specified by setting the Authentication mechanism which matches the user configured in the PKI Proxy Server. When using HTTP NTLM authentication the current user credentials are automatically used. For Secret Key and HTTP Basic authentication specify both the user and secret key or password. |
| Server's TLS Identity | The TLS Fingerprints value holds a comma separated list of one or more TLS fingerprints identify the PKI Proxy Server. This value is obtained from the PKI Proxy Server settings tab after configuring the TLS server certificate. For instance 39C57481E978114FE7F164EB4E654B6B87787376. |
| Access PIN (Optional) | The Access PIN is an optional value which further restricts access to the certificate. When specified any application attempting to use the certificate on the client machine will also need to provide the specified PIN. This is not the PIN of the HSM configured on the server side, this is a user-defined PIN that restricts access on the client side. This setting is optional. |
| Logging and Monitoring | The Log and Notifications settings may be used to monitor client side operations as they happen. |
When configuration is complete, use the Test Connection button to confirm successful communication between the client side and the PKI Proxy Server. After pressing OK the certificate shared by PKI Proxy should be visible in the Current User's "Personal" certificate store in Windows.
Modifying Certificate Properties
Use the Edit button to update the certificate access properties, such as the access credentials, TLS certificate fingerprint, or logging options.
Removing the Certificate from the Windows Certificate Store
Click the Delete button to remove a PKI Proxy certificate from the Windows store. This does not delete the remote certificate. This operation only removes the certificate from the Windows store.
Disabling a Certificate
Use the Disable button to temporarily disable operations using the configured certificate. The certificate will continue to be visible in the Windows store but cannot be used for any cryptographic operations. Click the Enable button to re-enable the certificate.
PKCS#11
The PKI Proxy PKCS#11 Driver provides a standardized client-side access mechanism to certificates shared using PKI Proxy. Any third-party application that knows how to work with PKCS#11 can be used with this driver to create signatures with such certificates. PKI Proxy includes two versions of the driver, applicable for x64 and x86 applications:
- pkcs11/win32/pkiproxy_pkcs11.dll
- pkcs11/win64/pkiproxy_pkcs11.dll
Generally, there are no requirements for PKCS#11 drivers to be installed to a specific location (such as a directory included in PATH), meaning you can use it from the directory where it was installed, or copy/rename it to any location you find convenient.
Configuring the Driver
Prior to using the driver, a configuration file (.conf) must be set up so the driver knows how to communicate with the server. You can find the .conf file next to the pkiproxy_pkcs11.dll. For instance: C:\Program Files\PKI Proxy\pkcs11\win64\pkiproxy_pkcs11.conf
# This file contains settings for the PKI Proxy PKCS#11 driver.
# Please adjust the below parameters to match the actual settings
# of the PKI Proxy sharing application.

[driver]

# Location is the URL where PKI Proxy is running.
#
# Please check that the endpoint is reachable and/or
# allowed through on the firewall if accessing
# the certificate over the Internet.

Location = https://127.0.0.1:9266


# Access credentials: These credentials should match the credentials
# configured in the PKI Proxy server application for the certificate.
#
# The current version supports the following types of access credentials:
# Secret Key, HTTP Basic, and HTTP NTLM. The authentication type
# to use can be specified via the Auth configuration setting.
#
# 1. Secret Key
#
# In this mode you need to provide a pair of credentials via the User
# and SecretKey parameters. These parameters should match those set up
# for the certificate on the server side. For instance:
#
#   Auth = SecretKey
#   User = user
#   SecretKey = SecretAccessKey123
#
# 2. HTTP Basic
#
# This mode expects you to provide the username and password for the HTTP
# Basic authentication mechanism. These should match the credentials
# configured for the certificate in the PKI Proxy application. For instance:
#
#   Auth = Basic
#   User = user
#   Password = password
#
# 3. HTTP NTLM
#
# NTLM authentication lets you authenticate using the Windows-native
# authentication mechanism. Your local credentials are securely mapped
# to the credentials on the remote system. You do not need to provide
# any usernames or passwords for this to work; everything is done
# by Windows behind the scenes.
#
#   Auth = NTLM
#
# NTLM authentication with a user other than the current user is also supported.
# To specify a different user, provide the Username and Password parameters as well.
# For instance
#
#   Auth = NTLM
#   User = OtherUser
#   Password = OtherUserPassword
#
#
# Note: you can encrypt secret values, such as KeySecret, using the pkpenc
# tool from the tools directory.

Auth = SecretKey
User = User
SecretKey = User_Secret_Access_Key


# TrustedTLSCerts should match the fingerprint of the TLS certificate,
# as configured in the PKI Proxy service. For instance:
#
#   TrustedTLSCerts = 68D2E3D6A0FE5FEA72E25AD56706270F9F8B182A

TrustedTLSCerts = TLS_Fingerprint_From_PKI_Proxy


# The optional PIN setting configures the driver to request a PIN
# from any application that uses the PKCS#11 driver. When set, a
# connecting application must specify the PIN that matches the value
# set here. If not set (default), no PIN is required.
#
# Note: This PIN is exchanged only between the connecting application
# and the PKCS#11 driver. It is not used to access the shared certificate.

#PIN = 12345


# LogFile optionally specifies the path to a file on disk.
#
# Use LogMode to specify the required verbosity level. Possible values are:
#  0 - None
#  1 - Error
#  2 - Warning
#  3 - Info (Default)
#  4 - Verbose
#  5 - Debug

#LogFile = C:\temp\pkiproxy.log
#LogMode = 3
When editing the file, set "Location" to the address and port of the server, set the authentication settings for the user that you shared the certificate with, and set "TrustedTLSCerts" to the fingerprint of PKI Proxy's TLS certificate. You can find the correct fingerprint in the Settings tab of the PKI Proxy UI here:
Signing Files
One of the primary use cases for PKI Proxy is code and document signing. When the certificate is present only on a single machine, PKI Proxy allows other machines to perform code signing without direct access to the certificates. The sections below detail the most common code signing scenarios.
Jarsigner
The Jarsigner utility supports using PKCS#11 natively. By configuring Jarsigner to use the PKI Proxy PKCS#11 Driver signing can be performed relatively simply. To configure Jarsigner to use the PKI Proxy PKCS#11 Driver a configuration file must be created with contents like in the example below. This file tells Jarsigner which PKCS#11 driver to use. Save this file in a convenient location. The name of this file is not important, and this article will use jarsigner.config.
jarsigner.config Example
name = PKIProxy
library = "C:\\Program Files\\PKIProxy\\pkcs11\\win64\\pkiproxy_pkcs11.dll"
description = PKIProxy PKCS#11 Driver
slot = 0
Jarsigner Execution
In the command below MyAlias is the alias of the certificate defined in PKI Proxy when the certificate was initially selected. The alias/label should either be double quoted, or unquoted. Single quotes around this value are not supported by Jarsigner. For example:
jarsigner
  -verbose
  -tsa http://timestamp.digicert.com
  -keystore NONE
  -storetype PKCS#11
  -providerClass sun.security.pkcs11.SunPKCS11
  -providerArg C:\path\to\jarsigner.config
  -storepass anything
  -sigalg SHA256withRSA
  MyApp.jar
  MyAlias
If signing succeeded you should see output from Jarsigner like below:
>>> Signer
    X.509, CN=/N SOFTWARE INC., O=/N SOFTWARE INC., ST=North Carolina, C=US
    [certificate is valid from 1/12/23 7:00 PM to 1/12/26 6:59 PM]
    X.509, CN=Sectigo Public Code Signing CA R36, O=Sectigo Limited, C=GB
    [certificate is valid from 3/21/21 8:00 PM to 3/21/36 7:59 PM]
    X.509, CN=Sectigo Public Code Signing Root R46, O=Sectigo Limited, C=GB
    [certificate is valid from 5/24/21 8:00 PM to 12/31/28 6:59 PM]
    X.509, CN=AAA Certificate Services, O=Comodo CA Limited, L=Salford, ST=Greater Manchester, C=GB
    [trusted certificate]
>>> TSA
    X.509, CN=DigiCert Timestamp 2022 - 2, O=DigiCert, C=US
    [certificate is valid from 9/20/22 8:00 PM to 11/21/33 6:59 PM]
    X.509, CN=DigiCert Trusted G4 RSA4096 SHA256 TimeStamping CA, O="DigiCert, Inc.", C=US
    [certificate is valid from 3/22/22 8:00 PM to 3/22/37 7:59 PM]
    X.509, CN=DigiCert Trusted Root G4, OU=www.digicert.com, O=DigiCert Inc, C=US
    [certificate is valid from 7/31/22 8:00 PM to 11/9/31 6:59 PM]

jar signed.

The signer certificate will expire on 2026-01-12.
The timestamp will expire on 2031-11-09.
SignTool (Authenticode)
Microsoft uses a proprietary Authenticode format for signing executable files. PKI Proxy supports the following methods for creating Authenticode signatures.
- Using Microsoft SignTool with the PKI Proxy KSP
- Using pkpsigntool as a drop-in replacement for Microsoft SignTool
Using Microsoft SignTool (KSP)
The easiest way to use signtool with PKI Proxy is by leveraging the PKI Proxy KSP module. In this case the use of signtool is no different to the way you would use it normally. The PKI Proxy client and server components will do their magic transparently and securely behind the scenes.
To sign an executable with a PKI Proxy certificate, use the following syntax:
signtool sign /fd SHA256 /sha1 2170a80c36fcafe9b0a2f5ce150ccdd496c7203d program.exe
In the command above, the 2170a80c36fcafe9b0a2f5ce150ccdd496c7203d string is the SHA1 fingerprint of the certificate to use. Signtool should output the result of the signing operation:
Done Adding Additional Store
Successfully signed: program.exe
Using pkpsigntool
The Microsoft SignTool utility does not include direct support for PKCS#11 drivers. While signtool can be used with PKCS#11 drivers such as PKI Proxy, it requires several additional steps and requires the use of a separate PKCS#11 tool that is not part of PKI Proxy.
For ease of use, PKI Proxy includes a utility called pkpsigntool, which is capable of creating Authenticode signatures and also includes support for PKCS#11 drivers. The Microsoft SignTool utility does not include direct support for PKCS#11 drivers.
To sign a library or executable with pkpsigntool use the following syntax:
C:\Program Files\PKI Proxy\tools> .\pkpsigntool sign /d "PKI Proxy Signature" /fd sha256 /f "..\pkcs11\win64\pkiproxy_pkcs11.dll" "C:\Users\nsoftware\Downloads\setup.exe"
The parameters are designed to be as similar to the Windows SDK's SignTool as possible. Supported parameters include:
| Param | Description |
|---|---|
| /d | Specifies the short description string that is embedded into the signature. | /fd | Specifies the digest algorithm to use for signing, for instance sha256. | /f | Specifies the path to the 64-bit PKI Proxy PKCS#11 driver to use. | /tr | Specifies the RFC 3161 compatible timestamp server to use. | /td | Specifies the digest algorithm to use for timestamping, for instance sha256. | /ac | Specified a certificate file to be added to the signature block. This is typically used to include intermediate and root CA certificates. | /p | Specifies a PIN, if required. If the driver is configured to require a PIN from connecting applications, the PIN can be specified by setting this parameter. |
If the sign command is successful you will see output like:
Opening PKCS#11 storage...
Storage opened, looking for a non-empty slot...
Token found in slot #0 (PKI Proxy PKCS11 Module Slot 0)
Logged in, looking for the certificate
Signing using certificate: /C=US/ST=North Carolina/O=\/N SOFTWARE INC./CN=\/N SOFTWARE INC. (expires: 1/12/2026 11:59:59 PM)
SUCCESS: C:\Users\nsoftware\Downloads\setup.exe
All files have been processed successfully
The signature of the library or executable can be verified by right clicking the file in Windows Explorer, selecting Properties, and inspecting the Digital Signatures tab.
Adobe
Using the KSP module with Adobe The easiest way to use PKI Proxy to sign documents in Adobe is by leveraging the PKI Proxy KSP module. You do not need to perform any extra steps for KSP-based signing with Adobe, as long as PKI Proxy has been configured to share a certificate and the certificate has been imported to the Windows certificate store using the Certificate Manager application.
Using the PKCS#11 driver with Adobe
You can use PKI Proxy to sign PDFs with Adobe products by registering the PKI Proxy PKCS#11 DLL:
- First, disable Protected Mode by navigating to Edit -> Preferences -> Security (Enhanced), and unchecking "Enable Protected Mode at startup", then restarting the application.
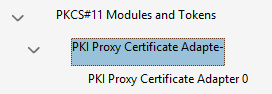
- To add the driver, go to Edit -> Preferences -> Signatures, and click the "More..." button opposite the "Identities and Trusted Certificates" section. In the dialog window that appears, click on "PKCS#11 Modules and Tokens" in the tree on the left, then click the "Attach Module" button at the top. Select the win32 variant of the PKI Proxy driver (at "C:\Program Files\PKI Proxy\pkcs11\win32" by default) to match the architecture of the application. After this step, the virtual device should be added to the list under the "PKCS#11 Modules and Tokens" branch:
- Click on the middle entry ("PKI Proxy Certificate Adapte-" in the example above), and then on the "Login" button at the top. If the driver configuration file (pkiproxy_pkcs11.conf) enables PIN protection for the driver, please provide the PIN when asked. If PIN protection is not enabled any value may be used.
- Finally, select the last entry in the list ("PKI Proxy Certificate Adapter 0" in the example). In the right panel, click on the certificate entry, then click the "Usage Options" button at the top and check the "Use for Signing" option.
To sign a PDF document, navigate to the signing facility of your PDF application. In Adobe Reader you can access it by clicking the "More Tools" button on the panel on the right, then selecting the "Certificates" applet in the list.
-
On the "Certificates" panel, click on the "Digitally Sign" button and draw the area where you want to place the signature:

- Select the shared certificate in the list that appears. It should have the "PKCS#11 device" marker in brackets to the left of its subject string. Click "Continue".
- Click "Sign" and specify the location where you want to save the signed document.
We appreciate your feedback. If you have any questions, comments, or suggestions about this article please contact our support team at support@nsoftware.com.