PowerShell ASP: Enabling Impersonation
Introduction
When PowerShell ASP is hosted in IIS, it is possible to enable impersonation. This means that the webpage will run under the identity of the individual that has accessed the page. This document will describe the steps needed to enable impersonation for a PowerShell ASP site.
Step 1 – Configuring Site Authentication
The first step to enabling impersonation for PowerShell Server is to ensure that Windows Authentication has been enabled for the site and that Anonymous Authentication has been disabled.
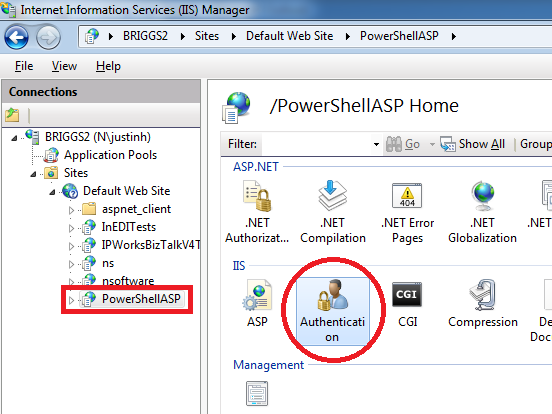
- Open IIS and select your site (see red box in the image below).
- Open the Authentication settings for the site (see the red circle in the image below).
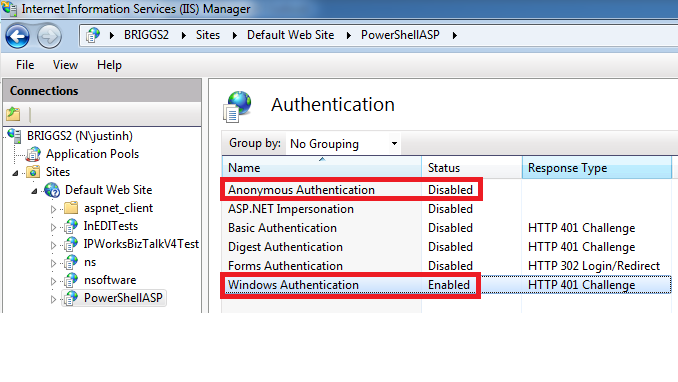
- Open the Authentication Settings and ensure that “Anonymous Authentication” is disabled and “Windows Authentication” is enabled. See below image.
Enabling Windows Authentication and disabling Anonymous Authentication will force the user to authenticate to the website with their Windows credentials when they access it. This will allow IIS to impersonate the user when running the page.
Step 2 – Configuring the Aspnet.config files to enable Impersonation
In order to enable Impersonation you must also enable the “alwaysFlowImpersonationPolicy” option in IIS. This can be done by updating the “Aspnet.config” file located in the .NET Framework directory on the server. This file is found in the following locations:
- .NET 2.0 32-bit: C:\Windows\Microsoft.NET\Framework\v2.0.50727
- .NET 2.0 64-bit: C:\Windows\Microsoft.NET\Framework64\v2.0.50727
- .NET 4.0 32-bit: C:\Windows\Microsoft.NET\Framework\v4.0.30319
- .NET 40. 64-bit: C:\Windows\Microsoft.NET\Framework64\v4.0.30319
Once the file has been found you can edit it to add the following:
  <runtime>
      <legacyImpersonationPolicy enabled=”false”/>
      <alwaysFlowImpersonationPolicy enabled=”true”/>
  </runtime>
Note: You must ensure that the correct Aspnet.config file is edited for your site. If the site is running on .NET 2.0 with 32-bit application support then you must edit the file at “C:\Windows\Microsoft.NET\Framework\v2.0.50727\Aspnet.config”. It may be beneficial to update each Aspnet.config just to prevent confusion.
Conclusion
Once the above steps have been completed, the web server should be restarted. Visiting a page in the PowerShell ASP site will now require that the user authenticate via their Windows logon credentials which IIS will then use to impersonate the user in the context of the PowerShell ASP page.
We appreciate your feedback. If you have any questions, comments, or suggestions about this article please contact our support team at support@nsoftware.com.


