
PowerShell Server: Getting started with SSL Tunnels
Contents
Overview
PowerShell Server's SSL Tunnels can accept either plaintext or SSL-secured incoming connections, and can establish either plaintext or SSL-secured outgoing connections. These settings can be used in any combination, allowing for secure connections to what would otherwise be plaintext resources, and vice versa.
Creating an SSLTunnel
The Tunnels tab allows for the creation of SSL Tunnels through a simple interface:
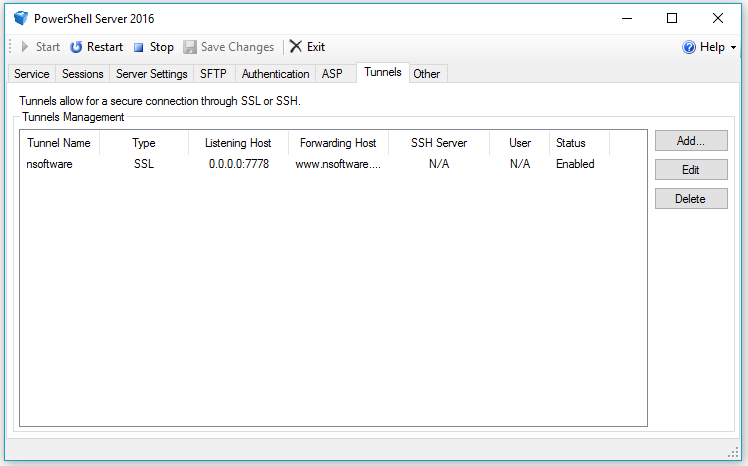
The tunnels list provides some information about existing tunnels:
- Tunnel Name provides a friendly name for the tunnel.
- Type indicates the type of tunnel. Plaintext, SSL, and SSH Reverse Tunnels are supported.
- Listening Host indicates where the tunnel is listening.
- Forwarding host indicates where the tunnel is directing its traffic.
- SSH Server is applicable only for SSH Reverse Tunnels
- User is the SSH username and is not applicable to SSL Tunnels.
- Status indicates whether the tunnel is Enabled or Disabled.
Clicking the Add... or Edit buttons will present a form that can be used to create a new tunnel, or edit an existing one, and clicking Delete will remove the selected tunnel.
To create a new SSL Tunnel, click Add... in the Tunnels tab and select SSL Tunnel from the Tunnel Type dropdown menu. This will present the following form:
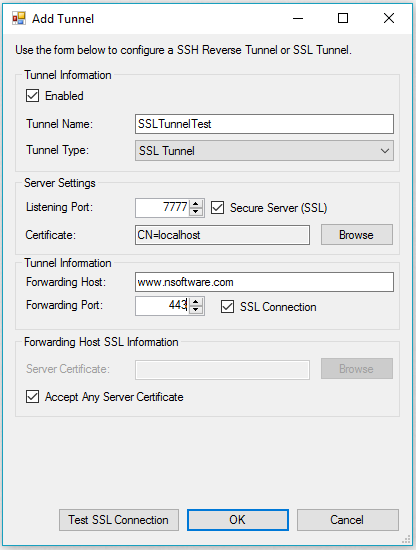
- Enabled indicates whether the tunnel should be active or not.
- Tunnel Name provides a friendly name for the tunnel.
- Tunnel Type indicates the type of tunnel. SSL and SSH Reverse Tunnels are supported; this guide only covers SSL Tunnels.
- Listening Port specifies the port on which the SSL Tunnel will listen.
- Secure Server indicates whether incoming connections will be secured with SSL.
- Certificate selects the certificate with a private key to use when hosting the tunnel (applies when Secure Server is enabled).
- Forwarding Host is the host where the tunneled traffic will be forwarded.
- Forwarding Port is the port to which the tunneled traffic will be forwarded.
- SSL Connection indicates whether the outgoing connection should be secured with SSL.
- Server Certificate selects the public certificate of the forwarding host (applies when SSL Connection is enabled and Accept Any Server Certificate is disabled).
- Accept Any Server Certificate indicates whether to automatically accept the certificate presented by the forwarding host (applies when SSL Connection is enabled).
After configuring the SSL Tunnel, save changes and restart the server to begin using the tunnel.
Using an SSL Tunnel
Once the SSL Tunnel has been added to PowerShell Server, click Start in the toolstrip at the top to start the server and establish the SSL Tunnel. Once started, the endpoint can be reached by connecting to Listening Host. In the case of this example, where the endpoint is a web server, the browser can be used to navigate to hostname:7777 in order to view the nsoftware.com webpage.

Note that the SSL Tunnel simply forwards TCP traffic, so this method could be used to access a variety of protocols. This example demonstrates using the tunnel to access a web page over HTTP, but this method could easily be adapted to access any type of server.
We appreciate your feedback. If you have any questions, comments, or suggestions about this article please contact our support team at support@nsoftware.com.