
Getting Started with Qt
Contents
- Introduction
- Adding the Toolkit Library to a QT Project
- Adding and Using Components
- Previous Version (2020)
Introduction
The following step-by-step instructions will help you use our C++ Edition components with QT Creator.
The C++ Edition allows users to use complex internet protocols and tools in the C++, Objective-C, and C software languages in a way that is simple and time-effective. Since Qt uses the C++ coding language as an implementation language, the C++ Edition also gives users the ability to use our components in Qt Creator. The C++ Edition toolkit can be added as an external library in QT Creator, which allows for seamless integration into existing QT Creator projects.
To get started, install the C++ Edition from our website, start a project with a MinGW kit, and follow the instructions below.
Adding the Toolkit Library to a QT Project
To link our toolkit for use within the QT creator, do the following:
1. To add a library, right-click on the project folder in the Projects menu, as shown below.
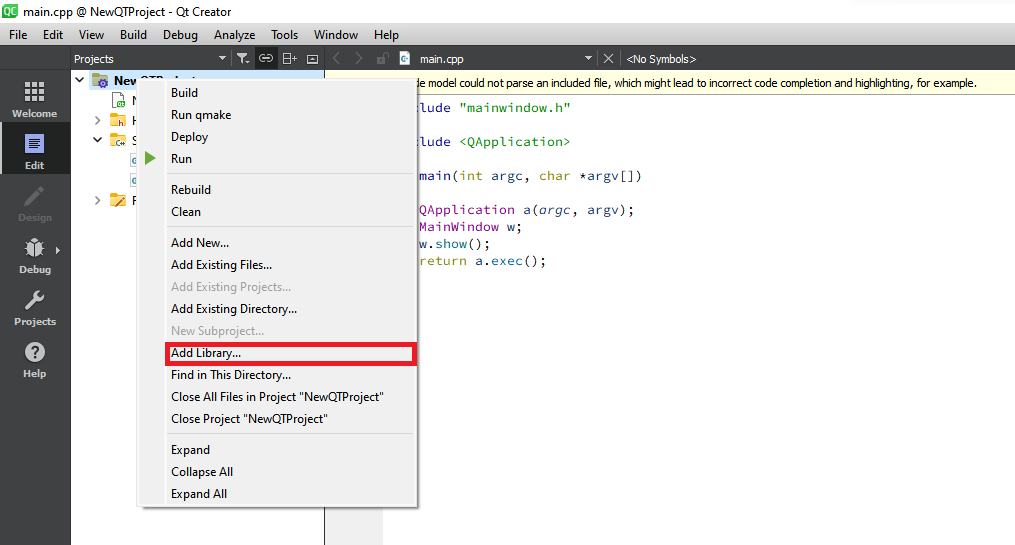 2. Select the Add Library option, which is outlined in red above. A modal will appear.
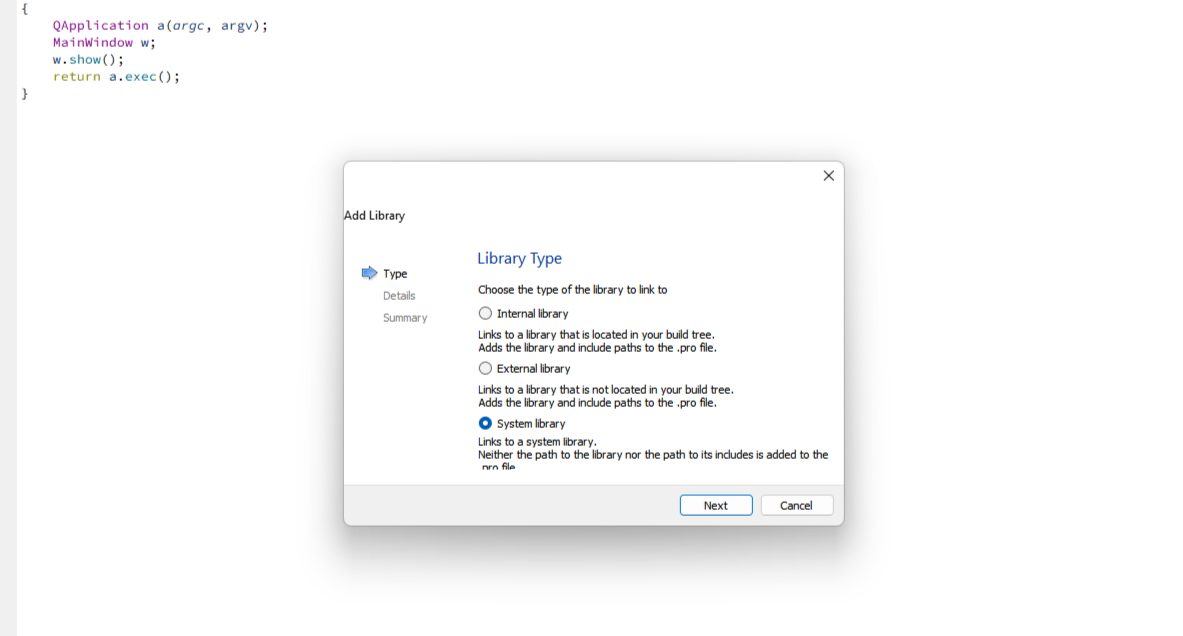
3. Select the External Library option, as shown in below. Upon selection of the option, the modal will display a prompt for an external library entry.
2. Select the Add Library option, which is outlined in red above. A modal will appear.
3. Select the External Library option, as shown in below. Upon selection of the option, the modal will display a prompt for an external library entry.
 4. Select the ipworks22.lib file within either the lib or lib64 folder within the IPWorks installation directory. The lib folder contains a 32-bit version of the IPWorks toolkit while the lib64 folder contains a 64-bit version of the IPWorks toolkit.
5. Ensure that the Add ‘d’ suffix for debug version is unchecked, as shown below.
4. Select the ipworks22.lib file within either the lib or lib64 folder within the IPWorks installation directory. The lib folder contains a 32-bit version of the IPWorks toolkit while the lib64 folder contains a 64-bit version of the IPWorks toolkit.
5. Ensure that the Add ‘d’ suffix for debug version is unchecked, as shown below.
 6. Click the Next button. The modal will display a code snippet that will be added to the project’s .pro file.
7. Click Finish. The library has been added to the project.
6. Click the Next button. The modal will display a code snippet that will be added to the project’s .pro file.
7. Click Finish. The library has been added to the project.
Adding and Using Components
Each of our Qt toolkits includes native libraries for Windows, Linux, and macOS; as well as the .h files necessary to use them in a Qt project. You'll find the files to be used in Qt projects in the include/qt directory.
Adding Components to a Project
- Add the header file of the component to be used under the HEADERS variable in the .pro file. The HEADERS variable will look something like this:
HEADERS += \
    mainwindow.h \
    [INSTALLATION_DIRECTORY_PATH]\include\qt\qhttp.h \
Note: It is recommended to install or copy the required files to a path which does not contain spaces. However, if the path does have spaces, using the "short path" will ensure the path does not have spaces. On Windows, you can use the command prompt or PowerShell snippet shown below to obtain a "short path" for the installation directory. Note that short paths never contain spaces, but can vary from machine to machine. If the .pro file will be used on multiple machines, it is recommended to copy the include, lib, and lib64 folders to a different location without spaces.
// For Command Prompt
CMD> for %I in ("C:\Users\nsoftware\Documents\IPWorks 2022 C++ Edition
include\qt") do @echo %~sI
C:\Users\nsoftware\DOCUME~1\IP33B3~1\include\qt \
// For PowerShell
PS> $(New-Object -com Scripting.FileSystemObject).GetFolder("C:\Users\nsoftware\Documents\IPWorks 2022 C++ Edition
include\qt").ShortPath()
C:\Users\nsoftware\DOCUME~1\IP33B3~1\include\qt \
2. Under the INCLUDEPATH variable, in the .pro file, add the following path: [INSTALLATION_DIRECTORY_PATH]\include\qt The INCLUDEPATH variable will look something like this:
INCLUDEPATH += $PWD/'../IPWorks 2022 C++ Edition/lib64' \
    '[INSTALLATION_DIRECTORY_PATH]\include\qt'
Using the Components
Once the components are available in your project, you can make use of them like you would any other complex type, refer to product documentation for more information about each component's API. To handle a component's events, your application can do one of the following: 1. Connect slots to the component's signals. 2. Subclass the component and override its event emitter functions directly.
Signals & Slots
Using signals and slots to handle component events works the same way it does anywhere else in a Qt application: your class implements slot functions, and then uses Qt's connect function to wire them up to the appropriate signal functions exposed by the component. In GUI applications, you can even "attach" the components to the widget hierarchy in order to leverage automatic connections.
Here's a small example of using automatic connections based on a sample widget project using the HTTP component included with IPWorks. By attaching the HTTP component instance to the widget hierarchy, the on_http1_Transfer slot (whose name follows the on_[object name]_[signal name] naming convention required for automatic connections to work) is automatically connected to the http1 object's Transfer signal.
/*
 * mainwindow.h
 */
#ifndef MAINWINDOW_H
#define MAINWINDOW_H

#include <QMainWindow>
#include <QMessageBox>
#include <qhttp.h>

QT_BEGIN_NAMESPACE
namespace Ui { class MainWindow; }
QT_END_NAMESPACE
class MainWindow : public QMainWindow
{
    Q_OBJECT
    public:
        MainWindow(QWidget *parent = nullptr);
        MainWindow();
    private slots:
        void on_btnGet_clicked();
        void on_http1_SSLServerAuthentication(HTTPSSLServerAuthenticationEventParams *e);
        void on_http1_Transfer(HTTPTransferEventParams *e);
    private:
        Ui::MainWindow *ui;
        HTTP http1;
        void reportError();
};
#endif // MAINWINDOW_H
/*
 * mainwindow.cpp
 */

#include "mainwindow.h"
#include "ui_mainwindow.h"

MainWindow::MainWindow(QWidget *parent)
    : QMainWindow(parent)
    , ui(new Ui::MainWindow)
{
    http1.setObjectName("http1");
    http1.setParent(this);
    ui->setupUi(this);
}

MainWindow::~MainWindow()
{
    delete ui;
}

void MainWindow::reportError()
{
    QMessageBox::critical(this, "Error", QString("Error [%1]: %2").arg(QString::number(http1.GetLastErrorCode()),
                                                                        http1.GetLastError()));
}

void MainWindow::on_btnGet_clicked()
{
    ui->tbResponse->clear();
    http1.SetFollowRedirects(FR_ALWAYS);
    if (http1.Get(ui->tbURL->text())) reportError();
}

void MainWindow::on_http1_SSLServerAuthentication(HTTPSSLServerAuthenticationEventParams *e)
{
    if (!e->Accept()) {
        QString msg = "Server provided the following certificate:\nSubject: %1\nIssuer: %2\n";
        msg += "The following problems have been determined for this certificate: %3\n";
        msg += "Would you like to continue connecting?";
        msg = msg.arg(e->CertSubject(), e->CertIssuer(), e->Status());
        e->SetAccept(QMessageBox::question(this, "Certificate Has Problems", msg) == QMessageBox::Yes);
    }
}

void MainWindow::on_http1_Transfer(HTTPTransferEventParams *e)
{
    ui->tbResponse->appendPlainText(e->Text());
}
Subclassing
In some cases, you may find it more convenient to handle a component's events directly. To do this, simply subclass the component in question and override the event emitter function(s) you wish to handle. Event emitter functions are those whose names match the Fire[Event] pattern. Below is a sample console project using the HTTP component included with IPWorks demonstrating subclassing.
#include <QCoreApplication>
#include <qhttp.h>
#include <QTextStream>

class MyHTTP : public HTTP {
    public:

        virtual int FireStartTransfer(HTTPStartTransferEventParams *e) override {
            out << "Transfer Started.\n" << endl;
        return 0;
        }

        virtual int FireEndTransfer(HTTPEndTransferEventParams *e) override {
            QTextStream out(stdout);
            out << "Transfer complete.\n" << endl;
            return 0;
        }

        virtual int FireTransfer(HTTPTransferEventParams *e) override {
            QTextStream out(stdout);
            out << e->Text() << endl;
            return 0;
        }
    };

    int main(int argc, char *argv[]) {
        QCoreApplication a(argc, argv);
        QTextStream out(stdout);
        MyHTTP http1;
        http1.Get("www.google.com");
        return 0;
}
Please refer to our documentation for additional details.## Previous Version (2020)
In the 2020 version, Qt has its own standalone edition. Much like the 2022 C++ Editions, The Qt editions of our products include everything needed to integrate them into cross-platform applications built with the Qt Framework. This section of the guide will provide essential information to help you get started using our 2020 components in Qt Creator. Specifically, we'll be discussing how to integrate components from our IPWorks toolkit into an application built with Qt 5.
Adding the Components to Your Project
Each of our Qt toolkits include native libraries for Windows, Linux, and macOS; as well as the .h and .cpp files necessary to use them in a Qt project. You'll find these files in the following places within the product's installation directory (individual component files have been collapsed into [component] for brevity):
[install_dir]
+---include
|       q[component].cpp
|       q[component].h
|       qipworks.cpp
|       qipworks.h
|       qipworkskey.h
+---lib
|   +---linux
|   |       libqtipworks.so.20.0
|   \---windows
|           qtipworks20.dll
|           qtipworks20.lib
|           qtipworks20s.lib
\---lib64
    +---linux
    |       libqtipworks.so.20.0
    +---mac
    |       libqtipworks.20.0.dylib
    \---windows
            qtipworks20.dll
            qtipworks20.lib
            qtipworks20s.lib
Qt Creator includes an "Add Library..." wizard, however it is simpler to add our components to your project by modifying the .pro file directly (especially for cross-platform projects). To begin, open your project's .pro file in Qt Creator. Before anything else, we're going to add some convenience variables to the .pro file to help simplify the rest of the modifications.
First, we'll add a variable containing the path to the installation directory (or wherever you're storing the include, lib, and lib64 folders shown above). We'll call this variable PRODDIR, which is the same name used by the .pro files in our demo projects. The path stored in this variable must not contain any spaces, otherwise qmake will generate a makefile with malformed targets, preventing your project from building correctly.
It is recommended to install or copy the required files to a path which does not contain spaces. See the note about short paths for more information.
Once you have a path without spaces, add a line like the one below to your .pro file. Keep in mind that relative paths will also work; for example, our demos set PRODDIR to ../...
PRODDIR = C:\PROGRA~1\NSOFTW~1\IPC4D1~1
In addition to PRODDIR, we'll declare a few more convenience variables: LIBDIR, PLATDIR, and LIBNAME. To declare these variables, add the following lines to your .pro file:
greaterThan(QT_MAJOR_VERSION, 4) { TARGET_ARCH = $${QT_ARCH} } else { TARGET_ARCH = $${QMAKE_HOST.arch} }
contains(TARGET_ARCH, x86_64) { LIBDIR = lib64 } else { LIBDIR = lib }
win32 {
  PLATDIR = windows
  LIBNAME = qtipworks20
} unix:!macx {
  PLATDIR = linux
  LIBNAME = qtipworks
} macx {
  PLATDIR = mac
  LIBNAME = qtipworks.20.0
}
Now that all of the convenience variables have been declared, we can make the modifications necessary to add the components to the project. For example purposes, assume we want to make use of the HTTP and XML components in our application. To do so, we need to tell qmake where to find the .h and .cpp files for those components, as well as the IPWorks library itself. To do this, add the following lines to your .pro file:
HEADERS += $${PRODDIR}/include/qhttp.h $${PRODDIR}/include/qxml.h
SOURCES += $${PRODDIR}/include/qhttp.cpp $${PRODDIR}/include/qxml.cpp
LIBS += -L"$${PRODDIR}/$${LIBDIR}/$${PLATDIR}" -l$${LIBNAME}
unix:!macx: LIBS += -lssl -lcrypto
INCLUDEPATH += $${PRODDIR}/include
DEPENDPATH += $${PRODDIR}/include
At this point, we've finished the basic steps needed to add the library and components to the project, and you should be able to compile your application successfully on all platforms. (On Linux, ensure that the shared library has been "installed" so that it's available to the linker at link-time, and the executable at run-time.)
Note: On Windows, if your application is compiled with the dynamic library (qtipworks20.lib) rather than the static library (qtipworks20s.lib), you'll need to ensure that the product's DLL is available at run-time. An easy way to do this is to have qmake copy the DLL to the output directory each time it builds your application. You can make this happen by adding the following lines to the end of the win32 {...} section we added to the .pro file earlier:
win32 {
  ...
  LIBPATH = "$${PRODDIR}/$${LIBDIR}/$${PLATDIR}/$${LIBNAME}.dll"
  CONFIG(debug, debug|release) { VARIANT = debug } else { VARIANT = release }
  copydll.commands = $(COPY_FILE) \"$$replace(LIBPATH, /, \\)\" \"$$replace(OUT_PWD, /, \\)\\$${VARIANT}\"
  first.depends = $(first) copydll
  export(first.depends)
  export(copydll.commands)
  QMAKE_EXTRA_TARGETS += first copydll
} unix:!macx {
  ...
Using the Components
Once the components are available in your project, you can make use of them like you would any other complex type, refer to product documentation for more information about each component's API. To handle a component's events, your application can do one of the following: 1. Connect slots to the component's signals. 2. Subclass the component and override its event emitter functions directly.
Signals & Slots
View the Signals & Slots section for the current edition.
Subclassing
View the Subclassing section for the current edition.
We appreciate your feedback. If you have any questions, comments, or suggestions about this article please contact our support team at support@nsoftware.com.