
Creating an SSH Reverse Tunnel
Requirements:
IPWorks SSH
Introduction
SSH Reverse Tunnels provide a way to establish connections to network resources that would not typically be available. For example, a server behind a firewall can be accessed through an SSH Reverse Tunnel without needing to authenticate through the firewall.
This guide will cover the basics of establishing and using a reverse tunnel with the SSHReverseTunnel component.
Before continuing, it is recommended to download IPWorks SSH in order to follow along with this tutorial.
Contents
SSH Reverse Tunnel Overview
SSH Reverse Tunnels use traffic-forwarding to bypass network restrictions. Rather than connecting directly to the target network, the client instead connects to a publicly accessible SSH host. This traffic is forwarded through an established tunnel to a 'middleman' inside the firewall-protected network, and this 'middleman' then forwards the data along to the target endpoint within the network. The SSHReverseTunnel component can be used to create a 'middleman' which establishes this tunnel and requests this forwarding. Conceptually, SSHReverseTunnel opens a door from the inside and invites traffic through that door.
The following diagram illustrates a typical SSHReverseTunnel scenario:
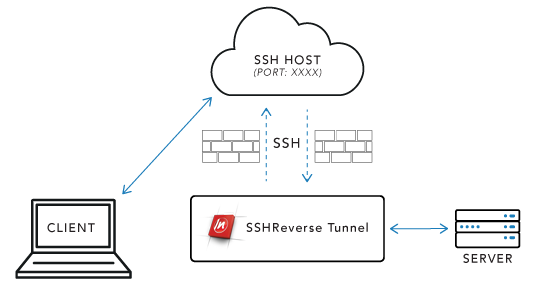
In the above diagram, SSHReverseTunnel is connected to the target server within a protected network. SSHReverseTunnel establishes an SSH tunnel with the public SSH host on any open port (represented here by XXXX), and requests that traffic on this port is forwarded to SSHReverseTunnel. SSHReverseTunnel then forwards this data to the target Server and receives the response. The response data goes back through the SSH tunnel to the SSH Host, where it is visible to the client. Thus the client is able to communicate with the protected server simply by connecting to the public SSH Host on the port specified by SSHReverseTunnel.
Local Forwarding Mode versus Event Based Operation
After establishing the tunnel, the SSHReverseTunnel component can act in one of two modes. In 'Local Forwarding' mode, the component will automatically forward data it receives from the tunnel to a target endpoint. This is indicated in the above diagram by the exchange of data between SSHReverseTunnel and the target Server.
The component also has 'Event Based' mode, where the incoming data is made available through events, and the way this data is used is up to the programmer. The parameters passed to the component's RequestForwarding method determine which mode the component will operate in. Please see the next section for more details.
Creating an SSH Reverse Tunnel
The first step in creating an SSH Reverse Tunnel is authenticating with the public SSH host. Set the SSHUser and SSHPassword properties to authenticate via password authentication, or set the SSHCert property to authenticate via certificate. Next call SSHLogon and pass the public SSH host address and port as parameters. You will usually need to implement an event handler for the SSHServerAuthentication event so that the component trusts the server's certificate. When this event returns, the Accept parameter must be True for the connection to succeed.
Here's a quick example in C#:
reverseTunnel.SSHUser = "test";
reverseTunnel.SSHPassword = password;

// attach event handler for SSHServerAuthentication
reverseTunnel.OnSSHServerAuthentication += (obj, ev) =>
{
  ev.Accept = true; // trust the server's certificate
};

reverseTunnel.SSHLogon(hostAddress, 22);
After authenticating with the public SSH host, the reverse tunnel can be established by calling the RequestForwarding method. This method takes the following parameters: Address, Port, ForwardingHost, and ForwardingPort.
The Address and Port parameters determine the interface and port on which the remote SSH host will listen for incoming connections. Any data received on this interface and port will be forwarded to the SSHReverseTunnel component.
The Address parameter can be specified in different ways:
- "0.0.0.0" means to listen on all IPv4 addresses.
- "::" means to listen on all IPv6 addresses
- "", or empty string, means that connections are to be accepted on all protocol families supported by the server.
- "127.0.0.1" means to listen on the loopback interfaces for IPv4
- "::1" means to listen on the loopback interfaces for IPv6
- "localhost" means to listen on the loopback interfaces for all protocol families supported by the SSH implementation.
Local Forwarding Mode
The ForwardingHost and ForwardingPort parameters determine whether and where the SSHReverseTunnel component will automatically forward the data it receives. If automatic outward forwarding ('Local Forwarding Mode') is desired, ForwardingHost and ForwardingPort should be the host address and port of the target endpoint.
Here's an example in C# of establishing a tunnel in Local Forwarding Mode:
reverseTunnel.SSHUser = "test";
reverseTunnel.SSHPassword = password;

reverseTunnel.OnSSHServerAuthentication += (obj, ev) =>
{
  ev.Accept = true;
};

reverseTunnel.SSHLogon(hostAddress, 22);

// create tunnel (IPv4) on port 7777; local forwarding to /n software website
reverseTunnel.RequestForwarding("0.0.0.0", 7777, "www.nsoftware.com", 80);

while (true) reverseTunnel.DoEvents();
Event Based Operation
If automatic forwarding is not desired, ForwardingHost should be set to empty string (and the value for ForwardingPort is ignored). In this mode, the data received through the tunnel will simply be made available through events; the programmer can then use this data however he or she wants.
Here's an example in C# of establishing a tunnel in Event Based Mode:
reverseTunnel.SSHUser = "test";
reverseTunnel.SSHPassword = password;

reverseTunnel.OnSSHServerAuthentication += (obj, ev) =>
{
  ev.Accept = true;
};

reverseTunnel.SSHLogon(hostAddress, 22);

// create tunnel (IPv4) on port 7777; no local forwarding
reverseTunnel.RequestForwarding("0.0.0.0", 7777, "", 0);

while (true) reverseTunnel.DoEvents();
Using an SSH Reverse Tunnel
In Local Forwarding mode, no more code is required to use the tunnel. Once the tunnel is established, the public SSH host (on the specified port) can be treated as if it were the endpoint server. In Event Based mode, more code is required to implement how incoming data should be handled. Both modes are explained in more detail below.
Local Forwarding Mode Usage
After establishing an SSH Reverse Tunnel in Local Forwarding mode, data flows uninterrupted between the SSH host and the endpoint server. Thus, simply by connecting to the SSH host on the port where the tunnel was established, the client can interface directly with the target endpoint. For example, after running the code in the previous section under 'Local Forwarding Mode', the /n software website is accessible through the SSH host.
As shown by the below image, by directing a browser to hostAddress on port 7777, the /n software home page is retrieved:
Directing the local forwarding to a website and interacting with a browser is just one of many ways to use an SSHReverseTunnel. The above example is only intended to demonstrate that data is flowing uninhibited between the client and the destination server.
Event Based Mode Usage
If ForwardingHost and ForwardingPort are not specified in the call to RequestForwarding, the SSHReverseTunnel component will make incoming data available through the component's Events.
When a client connects to the SSH host on the port where the tunnel has been established, the SSHChannelOpenRequest event will fire. Within this event, the Accept parameter determines whether the connection attempt succeeds; if the value of Accept is True when the event handler returns, the connection will be accepted and a channel will be opened. It is recommended to store the ChannelId event parameter from the SSHChannelOpenRequest event; this is used both to identify the source of incoming data and to specify which channel outgoing data should be sent through.
After accepting a connection, data incoming over that connection is received through the SSHChannelData event. The ChannelId event parameter identifies the channel through which the data was received. Data can be sent through the channel by calling the SendChannelData method with the ChannelId and Data as parameters. In Event Based Mode, the programmer is free to process incoming data and provide outgoing data as desired.
To close a channel established over the SSH Reverse Tunnel, simply call the CloseChannel method and pass the appropriate ChannelId.
Persistence and Connection Retry Settings
Many uses of SSHReverseTunnel require maintaining a persistent connection between the component and the public SSH Host. SSHReverseTunnel exposes several configuration settings for both maintaining a persistent connection and attempting to reconnect in the case of a failed connection. All persistence and retry settings work identically regardless of whether the component is in Event Based or Local Forwarding operation mode. The following is a table of the supported settings:
| Setting | Description |
|---|---|
| SSHKeepAliveInterval | Controls how often keep alives are sent |
| SSHKeepAliveCountMax | The max number of retries to send without getting a response |
| AutoReconnect | Whether to automatically reconnect after a disconnection |
| RetryInterval | The amount of time to wait between reconnection attempts |
| MaxRetryCount | The max number of times to attempt reconnection |
Keep Alives
The SSHKeepAliveInterval configuration setting governs whether or not the component will send keep alive packets to maintain a persistent connection. By default, the SSHReverseTunnel component will send keep alive packets every 30 seconds. This interval can be changed by setting SSHKeepAliveInterval, and keep alive packets can be disabled by setting this value to 0. The SSHKeepAliveCountMax configuration setting determines how many keep alive packets the component will send without receiving a response; by default this value is 5.
Automatic Reconnects
The AutoReconnect configuration setting determines when the component will attempt to re-establish a failed connection. By default (the value 1), the component will try to reconnect if a connection is successfully established and then broken. Note that this means the component will not (by default) attempt to retry the initial SSHLogon if it fails to establish a connection at all. To also retry the original SSHLogon, set AutoReconnect to the value 2. To turn off retry logic altogether, set AutoReconnect to the value 0.
MaxRetryCount and RetryInterval specify the number and frequency of retry attempts that the component will perform. By default, the component will make unlimited attempts to re-connect, and these attempts will happen every 5 seconds. Note that both of these settings are only applicable when AutoReconnect is set to 1 or 2.
The ReconnectAttempt event will fire any time the component attempts to automatically reconnect. This event provides information on both the current retry attempt and the component's retry settings. Additionally, the Cancel event parameter can be set to True within this event to prevent the component from making further retry attempts.
We appreciate your feedback. If you have any questions, comments, or suggestions about this article please contact our support team at support@nsoftware.com.