
Using the Components in macOS and iOS
Introduction
The following step-by-step instructions will help you create your own project for macOS and iOS and configure the project to use our components. The components are distributed in three editions:
macOS Edition
The macOS edition is geared towards combined macOS and iOS development and supports both Intel and the latest Apple Silicon machines. The toolkit is distributed as an XCFramework which allows for seamless multiplatform development, containing frameworks for macOS, iOS, iOS Simulator, and Catalyst. It also presents an updated Swift API for easy integration in the latest SwiftUI projects. Please refer to the instructions below for adding the XCFramework and configuring Xcode:
Add the XCFramework
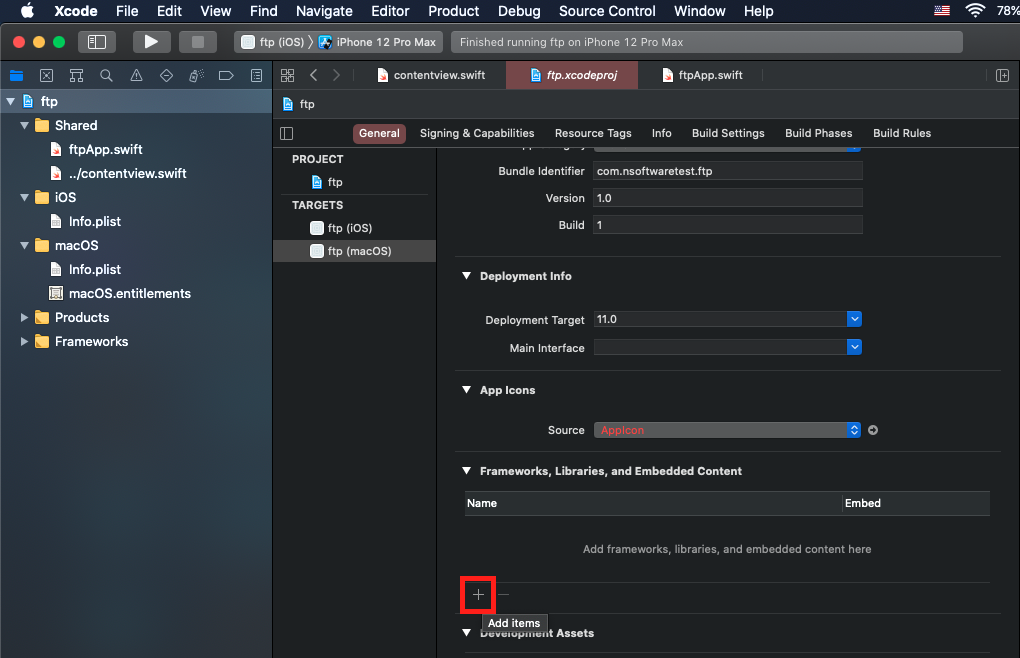
Add the XCFramework from the framework folder, either by Add files to ..., dragging the .xcframework file to the project, or by Add items in the General section. Make sure this is done for both targets in a Multiplatform application.
For example, navigate to the target's General section, then click Add items
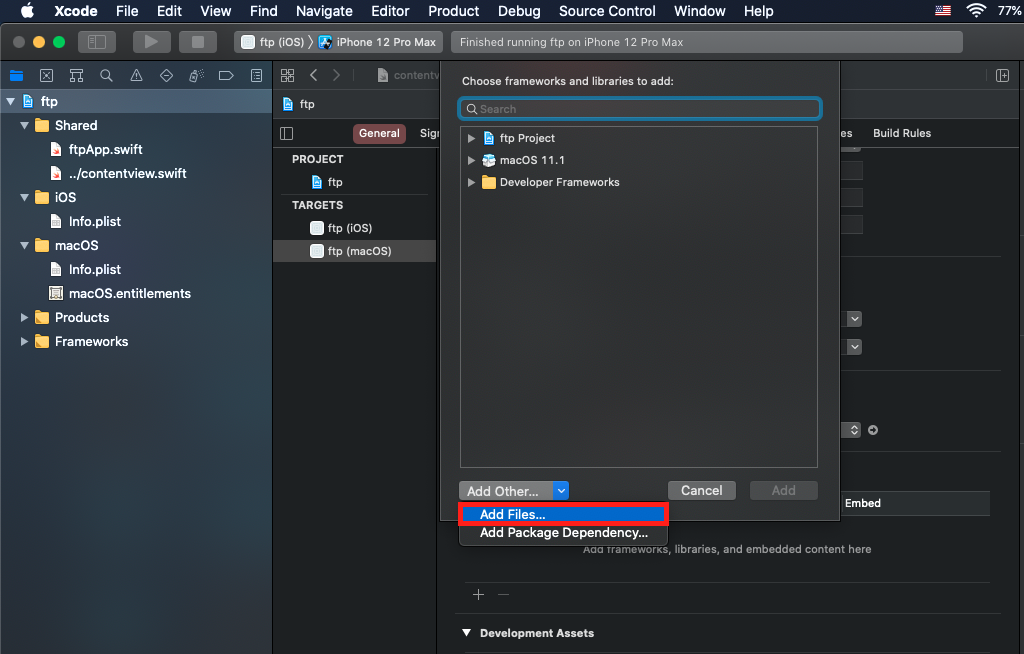
Select the Add Other... dropdown and click Add Files...
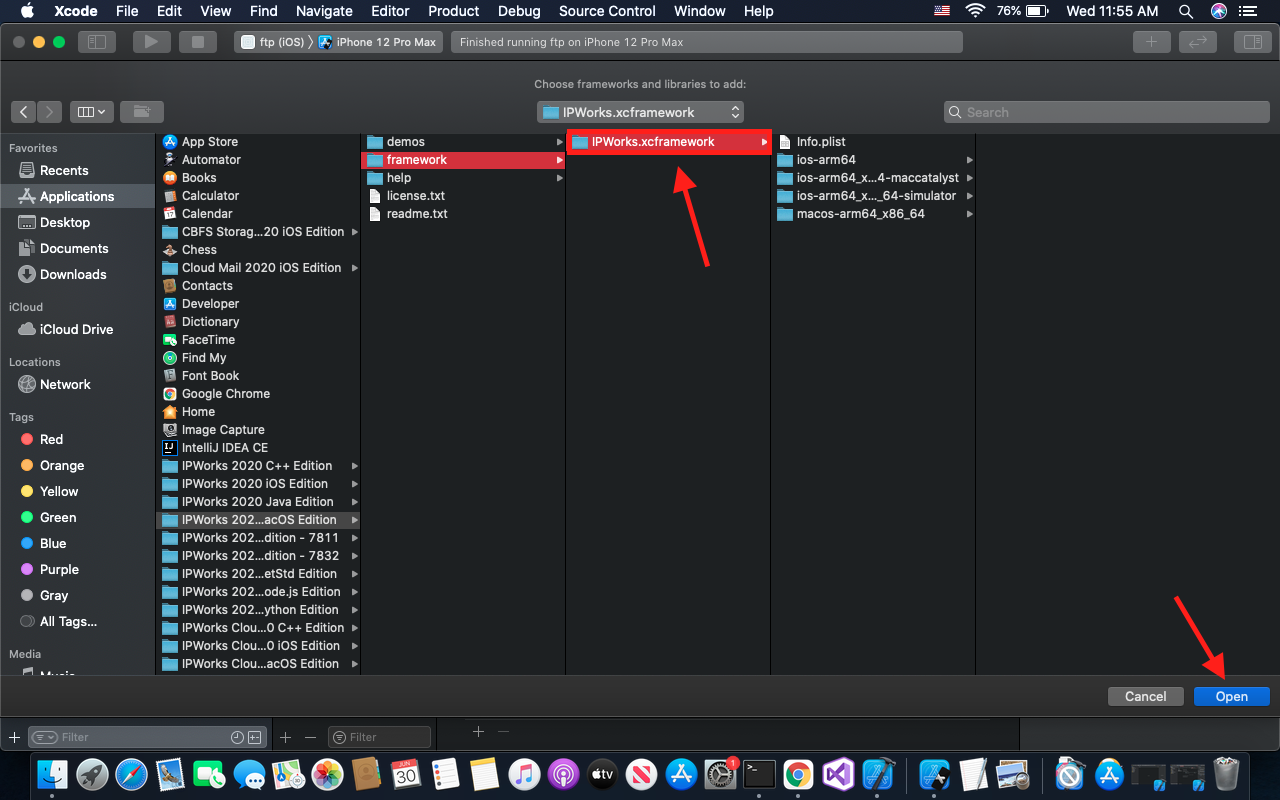
Navigate to the installation path and select the .xcframework file in the framework folder, then click "Open"
Link the XCFramework
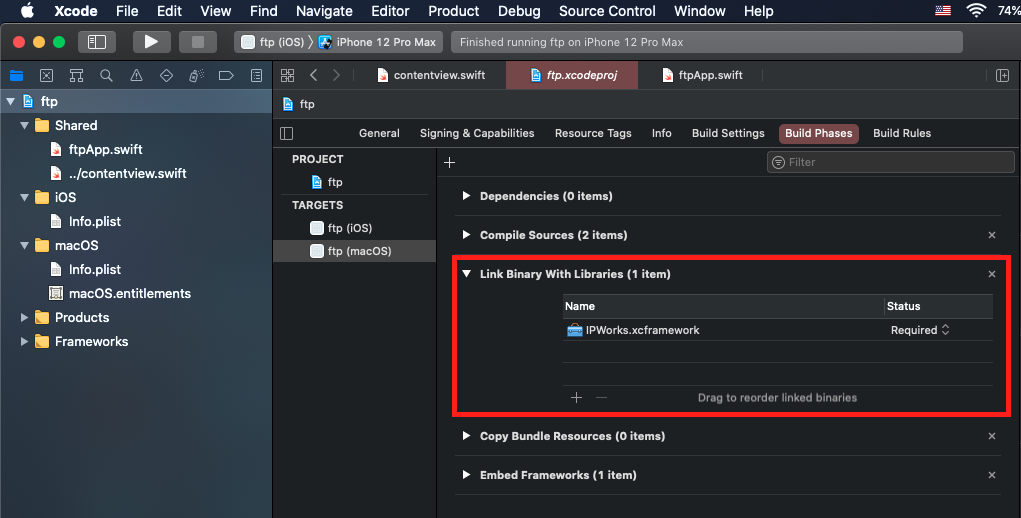
Usually, Xcode will update the linker setting automatically, but you can verify this by navigating to the Build Phases section and expanding Link Binary With Libraries. If the .xcframework file you added is not showing, click the + to add items. Then choose Add Other and navigate to the 'framework' folder of the product installation directory to select and add the XCFramework.
Use the Components
The components can then can be used by importing the module. For example:
@import IPWorks; // Objective-C
import IPWorks // Swift
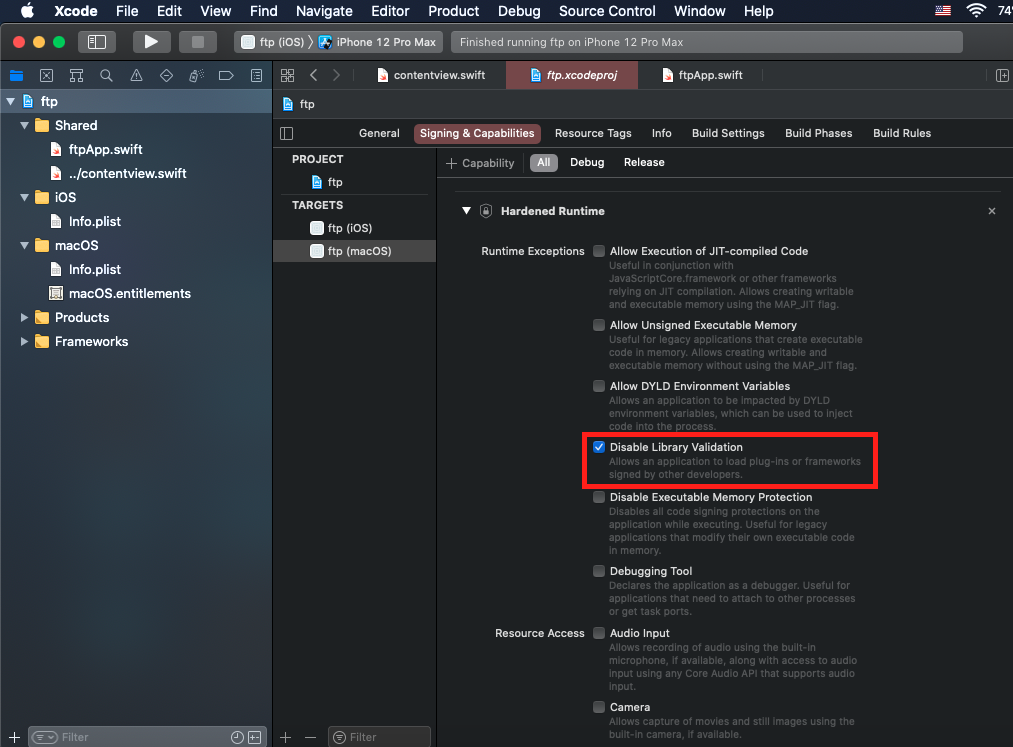
Note: For macOS applications you may need to Disable Library Validation as recommended by Apple for third party frameworks. This can be done in your project's Signing and Capabilities section and checking Disable Library Validation.
iOS Edition (Deprecated)
For new development we encourage using the macOS Edition instead.
The iOS Edition comes with a static library (.a file) and an XCFramework. The static library supports older versions of Xcode (11 and under) and can also be used via Rosetta on Apple Silicon machines. The XCFramework supports Xcode 11 and up and can be used natively on Apple Silicon machines. The XCFramework also supports Catalyst applications.
Using the XCFramework
To use the XCFramework in a iOS project, follow these steps:
- Add the XCFramework file from the /lib folder.
- Next, the framework needs to be linked. Usually, Xcode will do this automatically, but you can verify this by navigating to the "Build Phases" section, expand "Link Binary With Libraries", add a new framework, and navigate with "Add Other" to the 'lib' folder of the product installation directory to select the XCFramework.
The components can then can be used by importing the module. For example:
@import IPWorks; // Objective-C
import IPWorks // Swift
Using the static library
The steps for using the static library (.a file) in an iOS application are similar to those for a Mac application, as described below.
- In Xcode, from the project navigator create a new group called "IPWorks". This is just for organization.
- Right-click on the group and select "Add Files to <Your Project>". Browse to the "headers" folder of the IPWorks Installation and select the .h file for the component(s) you want to use in your project.
- Next we need to configure the linker flags. In the "Build Settings" section for the project, scroll down to the "Other Linker Flags" setting (under "Linking"). Set the flags to -lz -lresolv
-
The next step is to set the compiler language settings. In the "Build Settings" section of the project settings, find the "Apple LLVM X.0 - Language" section and change the following settings:
- Set C Language Dialect to C99 [-std=c99]
- Set C++ Language Dialect to Compiler Default
- Next, the library needs to be linked. Navigate to the "Build Phases" section, expand "Link Binary With Libraries", add a new framework, and navigate with "Add Other" to the 'lib' folder of the product installation directory to select the .a file.
- In iOS applications the "libc++.dylib" file also needs to be linked. Note that this may be called "libc++.tbd" depending on your Xcode version. This should be linked with the same process as the previous step, though it should be included in the default library list without selecting "Add Other".
- Finally, the search paths must be set in "Build Settings". Find both "Library Search Paths" (under "Search Paths") and "Runpath Search Paths" (under "Linking") and add the path to the 'lib' folder where the .a file resides.
This is all that's necessary. After importing the appropriate header files you should be able to now code, build, and distribute your application like normal. See the demos included in the toolkit for examples using the components.
C++ Edition (Deprecated)
For new development we encourage using the macOS Edition instead.
The C++ Edition supports Mac application development for both Intel and Apple Silicon machines via a dynamic library (.dylib). Please refer to the instructions below for adding the library and configuring Xcode:
- In Xcode, from the project navigator create a new group called "IPWorks". This is just for organization.
- Right-click on the group and select "Add Files to <Your Project>". Browse to the 'headers' folder of the IPWorks Installation and select the .h file for the component(s) you want to use in your project.
- Next we need to configure the linker flags. In the "Build Settings" section for the project, scroll down to the "Other Linker Flags" setting (under "Linking"). Set the flags to -lz -lresolv
-
The next step is to set the compiler language settings. In the "Build Settings" section of the project settings, find the "Apple LLVM compiler X.0 - Language" section and change the following settings:
- Set C Language Dialect to C99 [-std=c99]
- Set C++ Language Dialect to Compiler Default
- Next, the dynamic library needs to be linked. Navigate to the "Build Phases" section, expand "Link Binary With Libraries", add a new framework, and navigate with "Add Other" to the 'lib' folder of the product installation directory to select the .dylib file.
- Finally, the search paths must be set to the directory with the library linked in the previous step. In "Build Settings", find both "Library Search Paths" (under "Search Paths") and "Runpath Search Paths" (under "Linking") and add the path to the 'lib' folder where the .dylib file resides.
This is all that's necessary. After importing the appropriate header files you should be able to now code, build, and distribute your application like normal. Please see the demos included in the toolkit for examples using the components.
Swift Notes
Note: this section only applies for the iOS and C++ Editions. The macOS Edition presents an updated and easy-to-use Swift API that does not require the extra steps described below.
Using the XCFramework
After adding the XCFramework and configuring the project settings as described in the iOS section, it can be imported and used like other frameworks ( import IPWorks for example). You can reference the Swift API by appending "Swift" to an instance.
var http = IPWorksHTTPSwift()
Using the static library (iOS) or dylib (Mac)
Within the installation directory you will see a folder named "swift", which contains the wrappers necessary for using the components in Swift. To include the components in a project using Swift follow the steps below.
-
Right-click the project and select "Add files" to add the required files as below.
- .h files. The header file for each component must be included, and are found in the 'headers' folder of the installation. For instance, IPWorksHTTP.h.
- .swift files. The swift file for each component must also be included, and are found in the 'swift' folder of the installation. For instance, IPWorksHTTP.swift.
- .dylib files (macOS Edition) or .a files (iOS Edition). The .dylib/.a files for the product must be added as well, and are found in the 'lib' folder of the installation. For instance, libipworks.20.0.dylib or libipworks.20.0.a.
- Now we need to add a bridging header file. This may happen automatically as you add the .h and .swift files to the project. If not, you'll need to do this manually by creating a new header file. In the project manager, go to "New File", select "Header File", and save it in the project directory. This can have any name, such as bridging_header.h, and it should include one import statement for each component header, like this:
#import "IPWorksHTTP.h"
-
Now, we'll need to configure a number of things in the project's "Build Settings" tab:
- Go to the "Linking" section, find the "Other Linker Flags" setting, and set (or add) the flags -lz -lresolv.
- For macOS Only: Still in the "Linking" section, for the "Runpath Search Paths" setting, add the path to the 'lib' folder where the .dylib file resides. Be sure to surround the path in double quotes if it has spaces.
- Now, go to the "Swift Compiler - General" section and set the "Objective-C Bridging Header" setting to the bridging_header.h file created in the previous step.
- Finally, go to the "Search Paths" section, find the "Library Search Paths" section, and add the path to the 'lib' folder where the .dylib or .a file resides. Be sure to surround the path in double quotes if it has spaces.
-
Now, go to the project's "Build Phases" tab, and expand the "Link Binary With Libraries" section.
- Ensure that the .dylib or .a file appears there (if it isn't, you can drag it there from the Project Navigator sidebar).
- For iOS Only: You'll also need to add the libc++.tbd library; click the + button at the bottom of the section, search for libc++.tbd, and click "Add". (Note that, sometimes, Xcode will only add the library to the "Frameworks" folder in the Project Navigator sidebar, but won't actually add it to the list of libraries to link to the binary. If that happens, simply drag it to the "Link Binary With Libraries" section manually.)
After these steps you should now be able to use the components in your Swift code. For example:
var http = IPWorksHTTPSwift()
do {
    try http.get("https://www.apple.com")
    var data = http.transferredData
    print(data)
} catch {
    print(error)
}
We appreciate your feedback. If you have any questions, comments, or suggestions about this article please contact our support team at support@nsoftware.com.